Showing posts with label Golden Paints. Show all posts

Tuesday, March 27, 2012

Canvas Paper Painting

I've used Canvas Paper as a surface for atc's a few times, just love the linen-like texture that's on it. This fortnight's class is using the canvas paper and my favourite, Golden Paints for adding the colour. We'll be doing washes of colour but also using different implements to add further interest - like corrugated card, empty plastic or cardboard tubes, sequin waste etc. While I was doing my samples I discovered a happy accident which will become another class using canvas paper, gesso & Golden paints....that's for another time though.

Firstly I thought I'd show you a couple of pieces before I cut them down to atc size. The first one below is A5, so I can get 5 atc's from this sheet.


These two are both 2-1/2" wide x 7" tall so I can get 2 atc's from these pieces.


Samples now of atc using this technique for backgrounds...

"See"...


"Hope"...

"Ornament"...

"Dream"...

"Flourish"...


When I did the last technique, Paper Casting, I made a piece using my Dragonfly Legend stamp by Stampers Anonymous (a favourite of mine!) using the old fashioned method of laying the wet toilet paper directly onto the stamp and drying. This piece I made into a card front so it's larger than a normal atc.

"Dragonfly Legend"... (card)


"Mess"... (another atc using the paper casting method from the last technique)


Finally, this is a card that I made using gloss card from the technique before Paper Casting, Abstract Acetate. I still prefer the look on acetate than on gloss but for a card it's fine.

"One of a Kind"... (card)

Sunday, January 4, 2009

New ATC Technique Book Classes

I've been teaching at Scraptivate for over 2 years now so I figured it was time to recap some of the earlier techniques that I did in my atc classes. I always said I wouldn't do instruction sheets for my atc techniques but now I'm going to as we're going to build up a great technique book full of the atc samples that are made in class. Also, not everyone has a wonderful memory for techniques, (especially if they don't use them for 6 months or more...the techniques, not the brain!!!) so I thought I'd help out by doing instructions so they can refer back to them at a later date. Being my usual wordy self, I tend to "over-instruct" rather than give only sketchy details so I'm hoping the girls are happy to revisit the techniques months after they've been taught.


This is also linked to my goal for 2009. I'm not usually a goal-setter but this year I intend to put together a book with my techniques in it. I'm thinking along the lines of an e-book, mainly because I don't have a spare $10,000 to invest in a professionally made book and also the e-books are instant. I also have more control over how much detail I can go into as well as what pictures I want to include. I may end up making some hard-copies that will be for sale as well, these would be professionally bound and printed on decent paper but still cheaper than doing the whole type-setting thing. Comments??? Suggestions??? Thoughts???


So the first technique we are starting with is Texture Paste (Jo Sonja), also called Molding Paste (Golden) as well as Modelling Paste (Mont Marte) - they are all the same thing, they give texture and are fairly flexible still when dry. We are making the cover of our ATC Technique Book with Texture Paste and the picture below is my front cover of the book. It scans horribly, the colours are all out of whack so I may have to take a picture of it to try to get the true colour. I used Quinacridone Nickel Azo Gold as a wash, then a wash of Paynes Gray, then dry-brushed with Interference Oxide Green (Blue Shade). It was this last addition of the interference paint that frightened the scanner.....it made the whole thing look like I'd also dry-brushed it with white paint, the reflective properties of the interference was that bad!!!


Inside the book will go either 2 or 3 atc samples that the girls make in each class and over a year, they should have a wonderful reference book full of their own work to look back on.

This first atc sample is made by using the texture paste with a cuttlebug waste piece as a stencil. I do love this scroll die-cut by Cuttlebug, it's my absolute favourite of all the die-cuts!
"Fable"...
For this next one I lightly scraped the texture paste on and used a foam stamp to get the texture, then spritzed it with glimmer mist when the texture paste had dried. Usually I paint over the texture paste but wanted to try the glimmer mist - perfect!!!
"Memory"...
Lastly, I used the black texture paste (Jo Sonja) that comes in a tube. This is a little difficult to get, but if you can get some, do! It's wonderful stuff! It has a nozzle so you just pipe it out. This is how I did the tree below. Piped the tree out, let it dry overnight, then did a wash of Nickel Azo Gold, dried it, another wash of Paynes Gray, dried it again, then dabbed on some Quinacridone Crimson in places, dried it again and finally a light wash of Titan Buff and dabbed some of this off with a paper towel. Rub'n'buff in gold rubbed lightly in certain places finished it off. Love my Golden Paints!!!
"Tangled Branches"...

Hope everyone had a great Christmas and a Happy New Year. It was a first for me without my Dad and Joan but it was very busy socially with birthday parties as well as the usual Christmas lunch and New Years Eve party. A fine time was had by all and we remembered our loved ones who weren't with us, but tried not to feel too sad as they wouldn't have been happy about that!

Wednesday, April 9, 2008

New Collections Products, Faux Leather & Textured Paper

Well, Julie van Oosten from Collections has done it again! She has produced a wonderful new range of products with birds, new 6" x 6" papers, , flowers, butterflies and lots of other new stuff - but my most favourite would have to be the new windows that are perfect for atc's as they are 2-1/2" x 3-1/2" and mini doors/windows too! Here's an atc that I made using the Limited Edition range of black windows. This was included in a $50 Collections products raffle pack that was recently run at work, Scraptivate. Congratulations to Suzanne McMeekin for winning this fantastic pack and I hope you like the atc!

Last night I taught the Faux Leather Technique class to the Tuesday group of atc girls. Such a great technique and wonderful for making use of the fantastic Golden paints, though Jo Sonja paints also made an admirable impression as well! I don't have a scan of the raffle atc as I only finished it half an hour before the class started but I did make one in the class, strangely enough not using the Faux Leather technique. It was just a muck-around paint job on a piece of white cardstock showing the girls how impressive the Golden Quinacridone Nickel Azo Gold colour is. Natalie challenged me to make an atc while the class was going on so of course, you can't say no to the boss.....it needs a couple of brads still, but oh how wonderful this colour is! I only used one drop of the Nickel Azo Gold and a paint brush dipped in water and smooshed the paint around on the card, added a little more on my "transdermal applicator" to rub around the edges, dried it, added a little Micaceous Iron Oxide for shimmer and an image, some text paper, some thread around the image, a crackle stamp, some corrugated black card and one of my clear words on a piece of sharpie-coloured chipboard and it was done! Janick won this as a "second-prize" in the raffle that I got conned into doing!

Last Saturday's atc class that I taught was called Textured Paper. Take some cardstock, some scrapbook text scraps, book page scraps, tissue paper (printed and/or plain), some thick gesso, slap it all down, let dry and you have textured paper! This was the raffle atc.


In the last post I mentioned that I was doing something for a scrapbooking magazine. Here are a couple of ......I'm not going to say sneak peeks......"limited views" of the canvas. I won't be able to post the whole thing until after I come back from my holiday (8 sleeps to go!!!).


A big thanks to Jacky for including me in the "5 blogs I love to visit" award....I'm sure in some illustrious company with this one! Visit Jacky's blog to see who else she nominated. I'm not going to nominate for 2 reasons, I have done numerous blog nominations before and it's just too darn hard to narrow it down to 5! But I thankyou anyway Jacky for reading my blog. ;-)

Saturday, February 16, 2008

Credit Card Technique Backgrounds

I think Credit Card Technique backgrounds would have to be the easiest and most spectacular of all the different backgrounds that can be made! A big statement I know...but if you haven't tried it grab yourself a piece of sketch paper or cartridge paper, some paint, a water spritz bottle and a credit card - take a tip...don't use your current Visa card, swipe machines don't like paint gumming up their works! lol
Here's my samples for next week's atc class, including what colours I used to make each one. The colours are listed in order of application, one over the other. Water spritzing is done right at the end and no, you don't wait until it's all dry, just keep working constantly. No atc samples yet, just the backgrounds - these are all A4 size (approx 8-1/2" x 11").
First, my ABSOLUTE FAVOURITE!!! Quinacridone Nickel Azo Gold & Dioxazine Purple (both Golden Paints)...

next...Trans Magenta & Prussian Blue (both Jo Sonja)


next...Jo Sonja Aqua, Micaceous Iron Oxide (Golden), Jo Sonja Warm White


next...Monte Marte (brand) Veridian Green, Folk Art Metallic Antique Copper...


next... Jo Sonja Carbon Black, Quinacridone Nickel Azo Gold (Golden), Jo Sonja Warm White...


next... Sapphire & Burnt Umber, both Jo Sonja...

next... Cobalt Teal, then Cadmium Red Light, then Iridescent Silver Fine - all Golden...


....are you sick of them yet????.....

next... Paynes Grey (Golden) then Jo Sonja Warm White...


last one....Jenkins Green, Iridescent Copper Fine (Golden)...


I think I forgot to mention how much I love this technique....as you can tell by the samples here!!! This is one to give it a go, great for covers of altered books and chunkies as well as backgrounds for cards or atc's.
Simple instructions:
1 A4 piece of cartridge/sketch paper (a little thicker than ordinary copy paper)
paints - your choice of colours
water spritz bottle
old credit card
1. Squeeze on a line of paint up the top of the A4 (Quarto sized) piece of paper.
2. Using the credit card at a 45 degree angle drag it down the paper from top to bottom, scraping the paint along as you go....make it thin - you want coverage of the paper but not big clumps of paint.
3. Do the same thing with your second colour, thin line of paint up the top, drag it down...don't wait for any of it to dry, just keep working.
4. Take your spritz bottle and spray about 5 or 6 pumps over the page, trying for some larger splotches of water by putting your top "pump" finger over the hole a bit so it sprays out unevenly.
5. Count to 10, then take your credit card again and drag it down the paper, wiping the excess water and paint off.
6. Marvel at your creation!!!

Monday, January 28, 2008

Faux Leather & Soot Technique

My next atc class is on a Faux Leather background. We'll be using masking tape to get the basic look and then acrylic paint over the top. Best to stick to only a couple of colours as any more than 3 will make a lovely mud colour! I've just finished the background samples so I thought I'd put them up without any images or anything else on them so you can see them in all their glory.

The colours used on this first one are Transparent Yellow Iron Oxide & then Raw Umber (I have used all Golden paints but you can use what you have).


Next colours are Yellow Ochre then Quinacridone Burnt Orange...


Finally, Cobalt Turquoise and Burnt Sienna and then I wiped some of the colour off with a baby wipe...


There were plenty of oooohs and aaaaahs at last Saturday's atc class on the Soot Technique. As promised, I changed things around and discovered a new way of adding colour. The normal method of doing soot technique is to take a piece of white gloss card stock, hold it by the edges and shiny side down, then move it backwards and forwards....actually I do side-to-side, in a candle flame. My hand motion is actually quite fast, don't do it too slowly as it'll catch on fire! It needs to be low enough in the flame so you see black smoke coming up, if there is no black smoke it's not in the flame enough but if you hold it too close to the wick, you'll end up with scrape marks across it. Might take a couple of practices to work out the correct distance to hold it. Clean your stamp off thoroughly with a baby wipe after each stamping.

Check it regularly to make sure you are not making it too black, you want a coating of soot so that it's between a light grey and a dark grey...not black! Once done, place it soot side up, taking care not to touch it unless you want to do a "forensics" one with your fingerprints on it. Then take a clean rubber stamp (no ink) and stamp...prepare to be amazed as when you lift your stamp you'll see a wonderful stamped image on it. You can do several stamps to tell a story if you like but you can't mask anything so think about your placement. When you've finished stamping, then you need to seal it with either a fixative or a sealer. I've heard people have used hairspray with success too. I have a matte sealer so that's what I use.

You can also then use your Stazon ink to do more stamping if you like, the soot is set so there's no worries about masking if you want to do this now.

The last time I taught soot last year I decided I wanted some colour on it so I used alcohol ink on the gloss card first and then sooted and continued in the same way.....can you say GORGEOUS!!! So now I've come up with something else to add colour but unfortunately I can't say what it is yet as it's up for possible publication....if I can be bothered getting off my butt to write & submit!

These are 2 of the latest soot ones with the new colouring. "Art"...

"Yearning"...

Sunday, December 16, 2007

Christmas Canvases

Yesterday was a very full-on day for me. I taught my last atc class before Christmas, which was webbing spray, we also had a mini Christmas party during the class and the girls bought some very yummy treats to share! Who would've thought strawberries & marshmallows on a toothpick could taste so good!!!


Next up was the staff Christmas party at Natalie's house (the owner of the store) for Scraptivate, the most awesome shop where I work and teach here in Perth. We frequently get told by customers that we have the best and most unusual goodies in our store, a different range to all the other scrapbooking/papercraft stores in Perth AND we have the most helpful and friendly staff and teachers! Well, yep, I'd have to agree, we ROCK!!! So it was a delightful gathering of the staff/teachers and we had a Kris Kringle gift exchange. I received a fantastic mask from my pal Viv as well as some wonderful book pages with some "different" images and text that I'll definitely use on my canvases!

EDIT: This is the link here to the mask that Viv made for me...she did a great job photographing it and putting it on her blog so you can see how cool it is!!!


This is the canvas I made for Megan, who was my swap partner. From memory it's around 10" x 7" so it's a bit larger than the other 5 x 7's that I've done before. Still has the texture paste done first, then the Gothic book page added, then painted - Quinacridone Nickel Azo Gold and a wash of Dioxazine Purple plus some Quinacridone Crimson for some added colour. Add an image, some German scrap, some stamping (Gothic large script from Michelle Ward's Printed Matter rubber plate), then finally some gold embossing on the small Gothic script from the same rubber plate as well as on the word "sanctuary".


After the staff Christmas party we headed off at 8pm to Elice's 21st party at a restaurant, Elice is my son Jarred's girlfriend. He and Elice are over here in Perth for a month as Jarred is in the air-force and lives on the other side of the country, he's based at Williamtown near Newcastle, New South Wales. Actually, on Wednesday nights on SBS at 8pm there is a new series called Top Gun Pilots (I think?) and there is a lot of filming done at Williamtown so don't know if I'll actually get to see Jarred in it but he did tell me they filmed them doing the stuff that aircraft technicians do - yep, he's what they call a "black-hander"....wonder why??? lol It's a 6 part series and last Wednesday (12th Dec) was the first episode. Check it out if you're interested...we obviously are!

This brings us to today....Sunday....I have another Christmas engagement in the form of a lunch at a restaurant with the girls from the atc/abc clubs (art tarts club and altered book club). We are also doing a Kris Kringle exchange and I'm going to risk putting this next canvas up here as I'm hoping my recipient won't read my blog before she goes to the lunch today! It's a smaller canvas, 4" x 4" and I used the wonderful Tim's Shimmer - well this is what I call it anyway. It's the potion that he posted recently on his blog during his 12 tags of Christmas instructions. The recipe is: one dropper full of distress re-inker (I used brushed corduroy), 1 portion of Perfect Pearls - the end of a pop-stick is used for measuring this (I used Gold P/P), 3/4's fill one of the Ranger Mini Mister bottles with water after first adding the re-inker & P/P...then shake and spray.....delightful......Tim's Shimmer.....definitely will be doing this in a class! This canvas also makes use of the inchies and has texture paste that the inchies sit into.


Long-winded post today, if you've got this far and actually read what I've written, gold star for perseverence! If you've skimmed and just checked out the pics, well that's fine too! ;-)

Thursday, August 23, 2007

New Canvas


This is another canvas that I made, previous to the one in the post below. Basically following exactly the same technique....obviously in different colours though. I didn't really take much notice of which colours I used for this, something I will remedy in the future!


I must say that I learnt a lot about washes from Michael de Meng when I attended a workshop of his earlier this year. I had been using Golden paints previous to this as I had been a member of Claudine Hellmuth's yahoo group for quite some time and she loves her Golden's!!! I had the heavy body acrylics as well as the fluids, and mixed the Satin Glaze with them to get the wonderful washed-out look that I like..... but because of the very rich pigment of the Golden paints, they retain their strength of colour! It was Michael's suggestion of particular paint combinations though that really added a depth to my work that I liked.....thank you Michael ;-)


This weekend, more work on another couple of canvases, as I'm soon to teach a class in this technique at Scraptivate! Just need to wait for some product to arrive in store....speaking of product.....the white German Scrap has been really popular, both for scrapbookers as well as others that do more altered art/atc's etc. LOVE my German Scrap!!!


Busy weekend ahead... Friday night is our monthly catch-up with the ABC (Altered Book Club) girls, then my atc class on Saturday is on Transparent ATC's. All you need is acetate, alcohol inks, Collections Window Frames, Xyron 250, images & stamps...simple! I need to make the raffle atc so I'll post that on Saturday. Saturday night is a "girls-night-in" at Scraptivate, just a bunch of us who work and teach at the shop as well as a couple of other arty friends, playing 'til the cows come home! lol


Here's one of my previous transparent atc's...

Monday, May 7, 2007

The big reveal & 7 vegetables

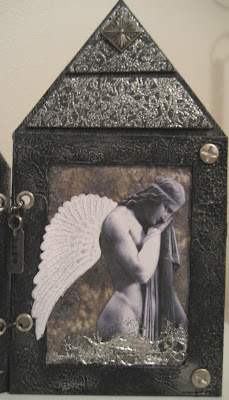
Weird title, I know! A certain someone called into the shop today and told me that delivery of her new product will be tomorrow so I can now post the pictures of what I was teasing you all with a few days ago. The "certain someone" is the lovely Julie van Oosten, and the product is a fantastic new house chipboard product. Below are some photo's of what I made using Julie's new Collections product...
Here are the 3 panels showing a little more detail...

It was all painted with Golden Payne's Gray, with some Golden Micaceous Iron Oxide painted in various areas to add some mica shimmer. Texture paste was added to the two large frames on the end panels as well as the smaller frame in the middle panel. After this was painted with the above paints, I also added some silver Treasure Gold to pick up the highlights. The middle panel has an angel transparency mounted on 3 of those small frames with the crackle background way down the bottom so when you look at it, there's a real depth to it. This middle panel is stamped with Brilliance Platinum Planet using the wonderful "Printed Matter" plate from Green Pepper Press (LOVE Michelle's stamps!).


On the 3rd panel above you can see one of the fantastic white wings that we now have in the shop for sale! (We also have matte red ones too!). Contact Natalie if you're interested in them. Click here for the link to the ebay store where they are.

I also did another single panel using this kit, more in the vintage style, though once again using a transparency...


Now to the 7 vegetables.....I didn't actually get to my studio on Sunday, instead I made some soup, a chocolate cake and vegged out for the rest of the day. As I was making the soup, my son who lives over East called me up, he & his girlfriend were out food shopping and he asked me, "Mum, what's in that 13 vegetable soup you used to make, we want to make it for dinner and we're ready to buy the 13 vegies, can you text me what they are and I'll ring you for instructions when I get home". Goodness knows where he got 13 vegetables from??? It is, and always was, only 7 vegetables, don't suppose I should complain, it's the best way I know of to get 7 different kinds of vegies into your kids in one hit....no matter WHAT their age! So in case you want to know, here it is:


7 VEGETABLE SOUP


1 onion

1 potato

1 zucchini

1 sweet potato

1 carrot

1 parsnip

1/2 butternut pumpkin

750 ml water

2 chicken stock cubes

1 x 400ml can lite coconut milk

dash nutmeg (optional)

Peel all the vegies except the zucchini (just wash that well), chop into chunks about 1-1/2" square, place all vegies & the water & chicken stock cubes in a large saucepan. The liquid won't cover the vegies, don't worry. Put the lid on and bring to boil, turn down and simmer for approximately 15-20 minutes, until a skewer inserted into the pumpkin goes in easily. Take off the heat, process either in a blender a cup at a time or, as I do, use a stab blender straight into the pan. Make sure it's all nicely pureed. Pour in the can of lite coconut milk and add a little nutmeg if you like.

That's it! So simple, only takes around 1/2 hour all up from start to finish. Let me know if your kids like it!

Sunday, April 15, 2007

Wonderful gifts & play-day with the girls


How lucky we are to have wonderful friends who bestow gifts upon us....here are a few that I have received lately.

This is one from France, a polymer queen from SAJ's (a local stamp group)....I was going to say something about her being the "moldy queen" but figured that was taking it a bit too far....'sides, she might not give me any more RAK's!!! lol

This is an atc that is just so beautiful and textural irl (geek-speak....in real life). Just lovely France, thankyou ;-) Check out France's blog for a great little tutorial on post-it books!


What an absolute feast for the eyes this atc from Dawn is!!! The background is actual tin with a torso mold on top that has been painted in the most fabulous metallic colours and gorgeous gold metal wings and the brads look just like little rivets holding it all together...this whole atc just screams "metal". Love it, love it, love it!


The very talented Jane Pisan gave me this atc that is ingeniously suspended from some old jewellery so it's actually a miniature piece of wall art! I really love the imagery on this atc, Jane told me when she made it she thought "hmmm, looks like Kelsey"....what Jane???...."old & relicy (not a real word) with a slight green tinge about the gills"? lol


A truly beautiful piece which I am thrilled to own ;-)


On Friday I had a catch-up with girls from our Art Tarts Club. Every month we try to take turns teaching each other a new technique, or at least an old one that's been re-vamped! Friday was Michelle's turn, we used black tissue paper, dress-making tissue, jac paper, embossing powders and paint to make fabulous crinkly backgrounds. We also did some stamping into fun-foam then attached this to an atc, coated the whole shebang with gesso and then painted over the top....this is a la Bernie Berlin's wonderful Artist Trading Card Workshop book that I'm sure most of the people in the atc world know all about and own their own copy!!! If you're in Perth and you don't have a copy, the store where I work has it!

So here are a couple of atc's that I finished this weekend from the backgrounds that I made on Friday. The blue one on the left is crinkled tissue paper attached to jac paper on an atc background, then painted all over with Titan Buff, then dry-brushed with Payne's Gray...love that Payne's Gray colour! The 2nd one is dress-making tissue crinkled, attached to jac paper, painted with Golden's Quinacridone Burnt Orange and then dry-brushed in a few areas with Golden's Interference Oxide Green (blue shade).


Another couple.....first one on left is another gel medium transfer using the Jet Print Photo Paper, love this stuff! The one on the right is a technique I learnt from Jen Jones, another very talented girl from Perth, made using some of that thick acetate that's on office reports, comes up much better irl - trust me! lol