Tuesday, December 7, 2021

STENCILLED OXIDES

You'll find my updated ATC Techniques List on a separate page at the top of my page
directly under my banner, "ATC Technique List - Current & Previous".


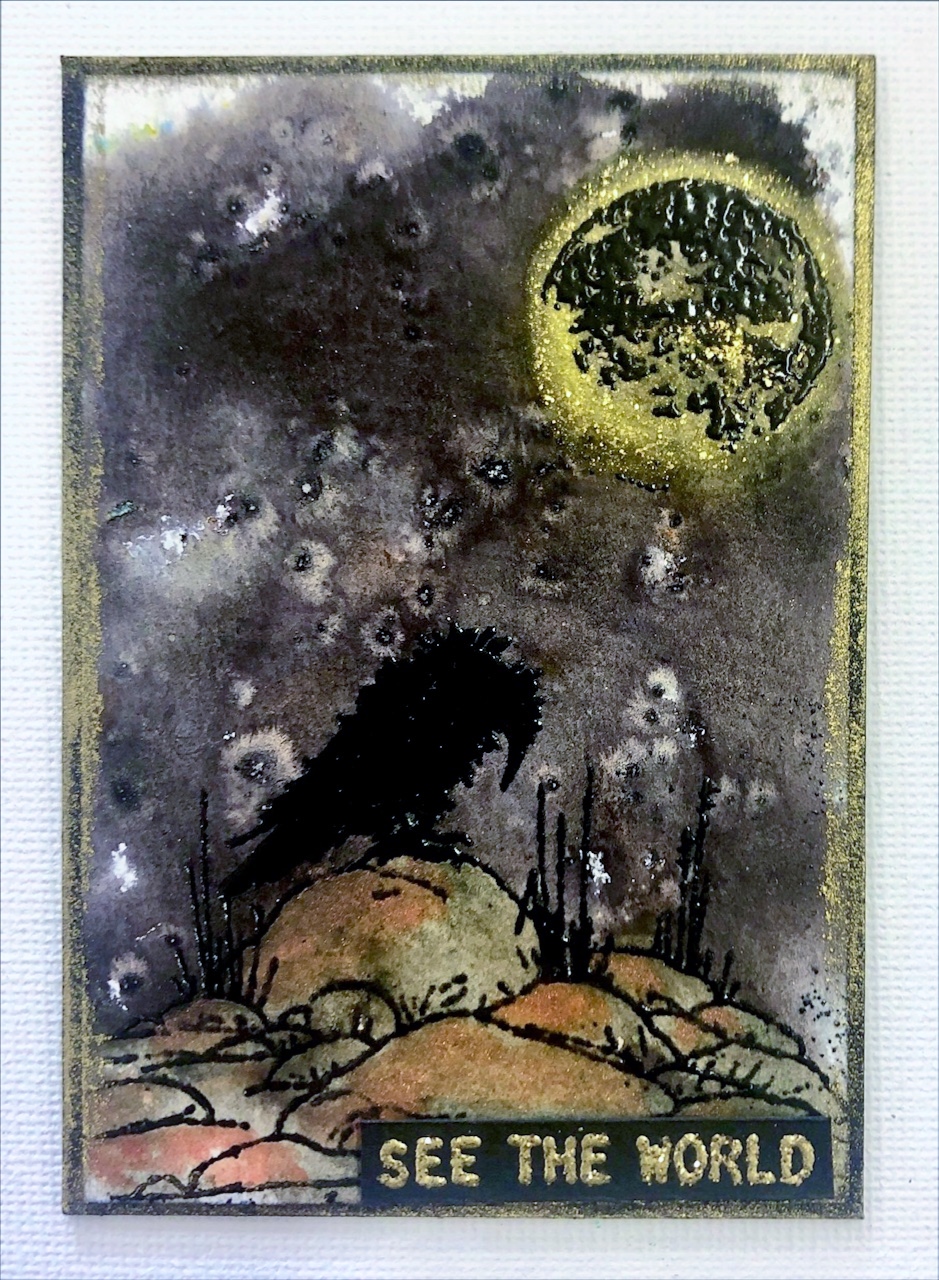
I have a lot of stencils and I decided they are a very underutilised resource, at least as far as I'm concerned.  So I decided to remedy that in the final class for the year, which is always a Christmas theme.  I used various stencils and Distress Oxide Inks with a blending brush (like the make-up style ones) and I found the colour went on very smoothly and easily on my Neenah white card stock. Cleaning the stencils is a breeze with a little spritz of water and dabbing off with a paper towel, which led to the amazing background that is on the first atc, Poe Ho Ho. I need to be mindful of my time limit in a class situation so I didn't use any pastes, gels or paints in this class, though it is also a great way to get even more out of your stencil collection.  Who has only 1 or 2 stencils?  No-one, that's who.  

"Poe Ho Ho"

"Santa came"


"Zombie Claus"


"Happy Horrordays"


"Dashing"


"Christmas Lights"


When I teach, I always demo the technique during
the class so I decided to make some cards from the samples
from the previous class, Alcohol Inked Vellum. The 
"Seniorita" card was what inspired me to do the stencil
backgrounds for this current class.

"Seniorita"


"Happiness"


Tuesday, November 23, 2021

ALCOHOL INKED VELLUM

 Blogger has changed and I am no longer able to update my ATC Techniques List so I have created a separate page for it.  You will now find it at the top of my page directly under my banner,  "ATC Technique List - Current & Previous". 

I have used alcohol ink markers on Vellum (though you can use tracing paper) with isopropyl alcohol to create these soft backgrounds. You can use alcohol inks as well but I found the markers better as they don't put as much liquid down, therefore keeping the vellum from warping. I have used Black Soot Distress Archival ink pad for all of my stamping, but then immediately clear embossed with super fine clear embossing powder. Just take care and use the heat gun in very short bursts so you don't warp the vellum. I like that you can use either side of the alcohol inked vellum, so you can choose to have it even more muted if you use the reverse side. Attach the vellum to white card to really make your stamped design and alcohol ink colours pop.

"Choose to shine"


"Brave wings"

"Sea water"

"Unfortunate ending"
(It wasn't until I finished this card that I realised
that it could be part 2 of the "Sea water" atc
above as the skeleton is a mermaid skeleton. 😏)

"Life is short"

"Life"
(The vellum section is only the centre part of this
atc. It was a scrap that wasn't quite wide enough
to cover the white backing card but I liked the
colours so decided to just go with it and stencil
the exposed edges of the white card.)

Tuesday, November 9, 2021

FAUX WATERCOLOURING

Watercolouring with stamps can be done in several different ways and this is just another variation that you won't need a stamping platform for as perfect placement isn't necessary.  Previously, I have coloured directly onto stamps with watercolour crayons, spritzed the stamp with water, then stamped.  This technique has a few more layers than that and I love how you can get a washed out looking background with the combination of the inks and water spray.  I have used both Ranger Distress Ink Pads and also the Distress Oxide Ink Pads to create these samples as well as some other smaller areas of stamping, embossing and a few different embellishments.  The trick with this technique is to embrace the white space for adding your other elements and allow the stamped focal image to take centre stage by making it the first thing your eye sees when looking at the atc.  I also used stencils to add a little more interest on Sleeping and I Don't Care.

"Sleeping" 


"Imperfections"


"Shine your light"


"Take the leap"


"I don't care"


"Easily distracted"


Tuesday, October 26, 2021

EMBOSSING FOLDER PAPER CASTING

The last time I did Paper Casting in class was back in 2012 and it had been around for years before that, albeit in a different way by doing the paper cast process over a red rubber stamp. Since embossing folders have been around, this is a much easier and quicker technique to do using the folders and a die-cut machine. I used toilet paper last time but found some great little serviettes at IKEA and tried them out, and they worked perfectly.  Previously I had used Tattered Angels Glimmer Mist to colour my backgrounds but this time around, nothing quite beats Ranger Distress Stain Sprays, the Mica Stain Sprays can also add a gorgeous bit of shimmer to the coloured background.

"Strange"


"Dark and gloomy"


"Bend"


"One life"


"Plant parenthood"


"Seas the day"


This last atc is from a previous class, Brushos &
Other Powders. 

"See the world"
                                           

Tuesday, October 12, 2021

GELLI PLATE & ACRYLIC INK

Acrylic Inks are one of my new favourite products.  There are so many things you can do with them and in this class, we'll be using them on a Gelli Plate.  You can get two different looks depending on whether you use just the acrylic inks on the Gelli Plate or if you add something to help the inks spread easily, and not bead up so much.  Both give great effects!  Plus, you don't have to wait for the inks to dry as you're not using paint to do your pulls.

"Fungi"


"IDGAF"


"Good for your soul"


"Moth to a flame"


"Choose to shine"


"Shine"
 

Tuesday, September 28, 2021

BRUSHOS & OTHER POWDERS

 Highly pigmented powders like Brushos, Cosmic Pixie Powders, Nuvo Shimmer Powders, Lindy's Magical Shakers etc have been around for a few years now and they are always a quick and easy way to create a background.  You can use them as they are, just a few gentle shakes, spritz with water and you get wonderful explosions of colour, or you can spritz your watercolour card first with water and then add. You can also just mix a single colour by itself on a piece of acetate to create one colour and use that for painting your background or your stamped designs. I've used a few different ways to create these backgrounds, including bleaching out a stamped image and then re-colouring with the pigment powders!

"Soul food"
(background & leaf shape coloured with Brusho
& Lindy's Magical Shaker powder)


"Soar"
(background created with Lindy's Magical
Shakers, trees stamped and Twinklets Diamond Dust
under the trees for extra sparkle)


"What the flock?"
(background using black Brushos only, then
bleached the stamped birds and re-coloured
with Nuvo Shimmer Powders)


"Curiosities"
(background with Nuvo Shimmer Powders and
Cosmic Pixie Powders, stamped skulls bleached
and re-coloured with Nuvo Shimmer Powders)


"If lost"
(background with Lindy's Magical Shakers &
Cosmic Pixie Powders, octopus stamped, embossed
and bleached)


"Wild side"
(background with Brushos and finger-painted
to blend, then Amsterdam Bronze paint applied
roughly on the bottom, overstamped with rocks
stamp and Amsterdam Pewter paint added. Tree
is JAC paper die-cut with brown foil applied)


"Let's party"
My granddaughter (7) wanted to do one herself
so this is her version of my What the flock?  She used
my stamp positioner so stamping was easy, I did the
bleaching for her and showed her how to colour
the birds with the Nuvo Shimmer Powders. She's
going to gift it to a friend at a holiday park we
are going to next week. 🥰


Tuesday, September 14, 2021

ALCOHOL INKS & ACETATE EMBOSS

I wanted to stay with acetate this fortnight as it was such a joy to work with at the last class so I combined a few favourites to make our backgrounds for this class  -  alcohol inks, acetate, embossing folders and a little coloured foil.  I didn't use the embossing folders on all of the backgrounds as I think you can get a great look just using the alcohol inks on un-embossed acetate.  You have to decide which side you'll stick down to your white card (this shows off the alcohol inks to their best advantage) as some of the alcohol inks in thicker areas stay sticky.   I just used the old trick of pressing some coloured foil onto the sticky bits and this transfers the foil and stops the stickiness.  I used either double-sided adhesive paper all over the back of the acetate piece to attach it to the white card, or just used skinny red-liner tape as this is the most transparent tape.  By the time you add all your bits & pieces to the top, you really don't notice the tape anyway.  Yes, I used the same wording on two of the atc's as the colouring and wording suited both.  😏

 "Potential side effects (#1)"


"Aquaholic"


"Use your wings"


"Potential Side Effects (#2)"
(no embossing folder used)


"Not what they seem"


"Foreboding"
(no embossing folder used)

Monday, August 30, 2021

LAYERED ACETATE

This is a technique I've been wanting to do for a while as it allows your background to have some texture to it while floating a piece of acetate above it, which also has some additional elements to create depth.  Not a technique that can be appreciated fully unless you are holding it in your hand though I'm hoping by including the picture of the side-view of "Anemones", it will give you some idea.  I used die-cut shapes cut from JAC (double-sided adhesive paper) to create the layers on top of the acetate and then used foil on those.  Though I also added some normal coloured die-cut shapes on a couple of them as well for extra interest.  For this technique, Couture Creations skinny foam tape and squares are your friend (I just about exclusively use the black as it gets lost in the shadows underneath).

"Succs to be you"


"Anemones"


Side view of Anemones, showing the raised areas
of the seaweed on front of the acetate, then the 
fish is raised on top of the acetate as well.


"Dark and gloomy"
This one is actually a shaker!  The little crystal and 
metal skulls and little skeleton inside the coffin
all move about along with some Distress Glitter.


"Dead of Night"
The bat is once again raised on top of the acetate.


"Wander"


"Find Joy"