Showing posts with label Collections products. Show all posts

Saturday, October 31, 2009

Faux Tin Type Technique & last of the Dominoes

I'll start off the with the last of the Domino atc's from the previous class.

"Flagrant Desire"...
"Mother Nature"...

The Faux Tin Type technique is trying to replicate the old tin type photo's using modern materials that most paper-crafters have...foil tape, transparency & a xyron machine. They are notoriously difficult to scan or photograph because of the reflective nature of the foil but you'll get the gist of it.

"Illusion"... (yes, I've used the black texture paste to create the border around this)


"Spectral"... (same image but with a cuttlebug frame made from chipboard)


"Liberation"... (another cuttlebug frame but with foil tape over the chipboard, thanks Ness for the great image, though I feel the word "Liberation" should have a question mark at the end of it! lol)


"Hex"...
"Twilight"...(yeah, I know....can't help it though, I've been a vampire fan since I was a kid with all those Bella Lugosi films & the original Nosferatu. Of course I've read Twilight, then went onto the more adult books of Laurell K Hamilton, the Anita Blake series. I've finished the series, 16 books in total and was reading 3 of them a week, just couldn't put them down! (Thanks Mandy for the loan but I've now ordered my own set). Now I have to wait for #17....darn it, I hate that! I do the same thing with Lee Child, he brings out only 1 book a year in April and I buy it and read it in a few days then have to wait another year for the next one.


More to come after I've done some demo's in my classes.
If you want to see a REALLY, REALLY, cool haunted house, take a look at my friend Julie's blog here. I think from memory she told me it was around two feet tall and she lists all the Collections chipboard products she's used to make this. Gorgeous!!! I told her I wanted to live in it. lol

Wednesday, April 9, 2008

New Collections Products, Faux Leather & Textured Paper

Well, Julie van Oosten from Collections has done it again! She has produced a wonderful new range of products with birds, new 6" x 6" papers, , flowers, butterflies and lots of other new stuff - but my most favourite would have to be the new windows that are perfect for atc's as they are 2-1/2" x 3-1/2" and mini doors/windows too! Here's an atc that I made using the Limited Edition range of black windows. This was included in a $50 Collections products raffle pack that was recently run at work, Scraptivate. Congratulations to Suzanne McMeekin for winning this fantastic pack and I hope you like the atc!

Last night I taught the Faux Leather Technique class to the Tuesday group of atc girls. Such a great technique and wonderful for making use of the fantastic Golden paints, though Jo Sonja paints also made an admirable impression as well! I don't have a scan of the raffle atc as I only finished it half an hour before the class started but I did make one in the class, strangely enough not using the Faux Leather technique. It was just a muck-around paint job on a piece of white cardstock showing the girls how impressive the Golden Quinacridone Nickel Azo Gold colour is. Natalie challenged me to make an atc while the class was going on so of course, you can't say no to the boss.....it needs a couple of brads still, but oh how wonderful this colour is! I only used one drop of the Nickel Azo Gold and a paint brush dipped in water and smooshed the paint around on the card, added a little more on my "transdermal applicator" to rub around the edges, dried it, added a little Micaceous Iron Oxide for shimmer and an image, some text paper, some thread around the image, a crackle stamp, some corrugated black card and one of my clear words on a piece of sharpie-coloured chipboard and it was done! Janick won this as a "second-prize" in the raffle that I got conned into doing!

Last Saturday's atc class that I taught was called Textured Paper. Take some cardstock, some scrapbook text scraps, book page scraps, tissue paper (printed and/or plain), some thick gesso, slap it all down, let dry and you have textured paper! This was the raffle atc.


In the last post I mentioned that I was doing something for a scrapbooking magazine. Here are a couple of ......I'm not going to say sneak peeks......"limited views" of the canvas. I won't be able to post the whole thing until after I come back from my holiday (8 sleeps to go!!!).


A big thanks to Jacky for including me in the "5 blogs I love to visit" award....I'm sure in some illustrious company with this one! Visit Jacky's blog to see who else she nominated. I'm not going to nominate for 2 reasons, I have done numerous blog nominations before and it's just too darn hard to narrow it down to 5! But I thankyou anyway Jacky for reading my blog. ;-)

Monday, March 3, 2008

Birdhouse, Cards & Scraptivate shop & 6 things

I hope you're all ready for lots of photo's in this post!


I thought I'd start off by showing you the wonderful store where I work and teach, Scraptivate here in Perth, Western Australia.

This is what greets you as you walk in the door, our display table, full of wonderful Collections samples, as well as some other bits & pieces.....mostly chipboard goodies that have been decorated to the hilt!

Here's the Collections products stand....as you can see, lots of lovely chipboard for altering...these are available online at Scraptivate and yes, we ship worldwide!!! If you've seen the lovely houses that Linda has had on her blog, they are part of the fabulous Collections range of products.....oooooh, don't I sound like an advertisement for Julie....she's a lovely girl (the designer of the Collections stuff and better still - a local!!!!).


Here's where we display all the upcoming classes.


Next is all the lovely German Scrap that we have for sale.

Anyone for a bit of patterned paper???


The tools and paint stand with a view into the classroom.


The ink/mists stand, rubber stamps are on the other side of this. This is not all of the shop, just a few of the stands, we have lots more!!!


We recently received some wooden birdhouses in the store for sale and we were asked if we wanted to take one home to decorate. I think there is about 6 of us who have them to alter and I've finished mine so thought I'd put the pics up.
The things that went into this are:

  • texture paste
  • gesso
  • Pearl White metallic paint
  • Dove Grey Stazon
  • Patina Glimmer Mists
  • Graphite Glimmer Mists
  • stamping on tissue paper
  • gauze
    shrink plastic (whoops, lost my bullet point on this one???)
  • metallic paper
  • antique pewter embossing powder
  • mica
  • brads
  • mouse cage wire
  • chipboard
  • sharpies & treasure gold
  • my clear words
  • a fuse
  • my own poem
  • and finally, clay wings.
Shrink Plastic Stampotique stamp...


The eye is stamped on mica...


The fuse and more shrink plastic (heart)...

The clay wings on the top of the house with my clear words, texture paste is on every 2nd square on the roof...


Front & left side view...

Front and right side view...

The fuse...with the backward "E". Sometimes you do things that you don't mean to do, but they turn out okay....I've had this "E" issue before!!! lol


A final close-up of the front panel...


So that's it for the birdhouse, now onto some cards that I have coming up in the March issue of Australian Stamping & Papercraft. I've had some atc's published 3 times before in this mag but I was asked to take part in a stampers challenge using a Stampers Anonymous stamp of a maple leaf with text. I know that Debbi is also doing this challenge so I can't wait for the issue to come out as Deb always does outstanding work! These are my 3 cards.


Spotlight technique using twinkling h2o's to colour sections of the leaf.


For this one I've alcohol inked the background gloss card, then done the soot technique on top.

Last one is shrink plastic tiles. I coloured the shrink plastic tiles first with alcohol inks, then stamped, then shrunk them.


So I'm not a card maker (can you tell??? lol), but I wanted to do something that incorporated some of the things that I teach in my atc classes. Now I can say I'm "published", not that it is a huge deal to me but for teaching purposes, every bit helps. ~grin~

Apologies if I've worn out your eyes with all these pics, also sorry if you're dealing with dial-up speed - been there, done that....what a pain! I know for some people, they have no choice....better slow speed than NO speed!

Finally, Sam tagged me to tell 6 non-important/quirky things about myself. I've done this before but it was 7 and I think I spilt my guts a little too much in that one....so here's some banal info about me...
1. I'm not a fake flower lover!
2. I used to tap-dance, do modern jazz as well as acrobats, AND I have the trophies to prove it!
3. I have 1 tattoo, got it when I was 15.
4. I love sharpies!
5. I have all my internal organs, except my gall bladder.
6. I am old, older than you think! (You are only young once, but you can stay immature indefinitely!)

I know I'm supposed to tag 6 people but I did this before so won't do it again....okay....now close your eyes.....sleeeeeeep.......sleeeeeeep.......sleeeeeeeep......

Monday, May 7, 2007

The big reveal & 7 vegetables

Weird title, I know! A certain someone called into the shop today and told me that delivery of her new product will be tomorrow so I can now post the pictures of what I was teasing you all with a few days ago. The "certain someone" is the lovely Julie van Oosten, and the product is a fantastic new house chipboard product. Below are some photo's of what I made using Julie's new Collections product...
Here are the 3 panels showing a little more detail...

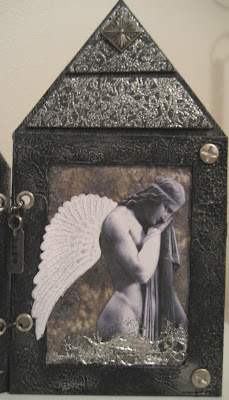
It was all painted with Golden Payne's Gray, with some Golden Micaceous Iron Oxide painted in various areas to add some mica shimmer. Texture paste was added to the two large frames on the end panels as well as the smaller frame in the middle panel. After this was painted with the above paints, I also added some silver Treasure Gold to pick up the highlights. The middle panel has an angel transparency mounted on 3 of those small frames with the crackle background way down the bottom so when you look at it, there's a real depth to it. This middle panel is stamped with Brilliance Platinum Planet using the wonderful "Printed Matter" plate from Green Pepper Press (LOVE Michelle's stamps!).


On the 3rd panel above you can see one of the fantastic white wings that we now have in the shop for sale! (We also have matte red ones too!). Contact Natalie if you're interested in them. Click here for the link to the ebay store where they are.

I also did another single panel using this kit, more in the vintage style, though once again using a transparency...


Now to the 7 vegetables.....I didn't actually get to my studio on Sunday, instead I made some soup, a chocolate cake and vegged out for the rest of the day. As I was making the soup, my son who lives over East called me up, he & his girlfriend were out food shopping and he asked me, "Mum, what's in that 13 vegetable soup you used to make, we want to make it for dinner and we're ready to buy the 13 vegies, can you text me what they are and I'll ring you for instructions when I get home". Goodness knows where he got 13 vegetables from??? It is, and always was, only 7 vegetables, don't suppose I should complain, it's the best way I know of to get 7 different kinds of vegies into your kids in one hit....no matter WHAT their age! So in case you want to know, here it is:


7 VEGETABLE SOUP


1 onion

1 potato

1 zucchini

1 sweet potato

1 carrot

1 parsnip

1/2 butternut pumpkin

750 ml water

2 chicken stock cubes

1 x 400ml can lite coconut milk

dash nutmeg (optional)

Peel all the vegies except the zucchini (just wash that well), chop into chunks about 1-1/2" square, place all vegies & the water & chicken stock cubes in a large saucepan. The liquid won't cover the vegies, don't worry. Put the lid on and bring to boil, turn down and simmer for approximately 15-20 minutes, until a skewer inserted into the pumpkin goes in easily. Take off the heat, process either in a blender a cup at a time or, as I do, use a stab blender straight into the pan. Make sure it's all nicely pureed. Pour in the can of lite coconut milk and add a little nutmeg if you like.

That's it! So simple, only takes around 1/2 hour all up from start to finish. Let me know if your kids like it!

Sunday, April 29, 2007

A sneak peek


I have spent a bit of time this weekend working on a couple of projects that are a little hush-hush at the moment.

I have to wait until they are ready for release from someone else before I can post the complete image, but I will give you a couple of close-ups of them....hope it piques your interest!
I loved doing them and can't wait for them to be let loose upon the World! lol These are only my interpretations of this "thing" (for want of a better word) so you can decorate it however you'd like to.


The previous 3 are done in one particular style....what?....can you tell??? The next 2 are another slightly different one that I made.


I also managed to make a couple of atc's this weekend, you know what it's like...you find a quote you just HAVE to use so you must make something to use it on!
I wish the sparkly stuff showed in this atc below, the background has been sprayed with Moon Shadow Mists in a couple of colours, then gold & black webbing spray added as well (at least you can see that!). The crystals down the bottom are Swarovski's, which by the way, have started to be cut with bevels around the bottom edge so they REALLY sparkle now!!!
This one below is going to be the raffle atc for my class this Saturday, Sheer Heaven Transfers. The girls are just going to love this technique....so cool (& easy - which is always a bonus!).
I'm meeting up with the girls from my Altered Book Club tomorrow night where we'll be swapping our Day of the Dead chunky pages. I've completed my pages, just haven't got around to scanning them yet, might leave that so I have something to post on Wednesday!

Sunday, March 25, 2007

Transparency atc's

I was having a play around with some transparency, colouring it with alcohol inks and running it through my 250 zyron to attach it to some atc's, which incidentally is the BEST way to attach transparencies to atc's....no muss, no fuss, no glue showing - brilliant! Anyway, I happened to have on my table some of those windows from Julie v Oosten (which we have at the shop) and I did a little "sandwich" experiment with some pics and a couple of bits of transparency and a couple of the windows to hold it all together. Of course the windows come in a 9 hole piece A4 size and need to be cut down but it gives you 4 complete sandwiches and 1 spare to just go on top of an atc.

Anyway, long story short, I was really happy with how they turned out. Here's some samples of them.....you have to imagine that you can hold them up and they are completely transparent...except where you see a picture, though the skull one is totally transparent as it's a stamped image.

I also finished a few atc's that I had started a while ago..... a foil tape one....

...this is a Sheer Heaven transfer...
...and lastly, a watercolour tube paint "fresco" technique atc...think this one might need to go to a certain "man" who KNOWS how to say aaahhhhhsemmmmblaaaagggggge!!! lol

For something completely different this afternoon, I went to the movies to see "Wild Hogs" with my hubby. We don't go out very often so when we do we don't mind splurging....went Gold Class. There's nothing like a theatre with less than 30 people in it, big plush electric recliner rockers with a table for your food and drinks which are bought to you at a pre-specified time (we had chicken skewers, wedges with chilli sauce & sour cream & wine!) and no-one under 18 allowed!!!!! The movie was good, funny from beginning 'til end. You'd need to be over 40 to recognise a "certain someone" towards the end...not telling, it'll give it away and I'm not a spoil-sport ;-)