Tuesday, November 26, 2019

MATT & SHINE CHRISTMAS

Each year the final class of the year is always a Christmas theme.  This year I've created some backgrounds that have a matte finish, but with a bit of shine to them as well.  A couple of the samples are just Distress Oxide ink backgrounds as the colours just worked really well with the pics that I chose but the others are all the Matt & Shine backgrounds.  Luckily I get a great choice of creepy Christmas quotes and images to use along with my embellishments and backgrounds.  Have a Creepy Christmas and I'll be back in 2020.  🖤💝🖤

"Merry Creepmas"
(Matt & Shine background)

"Zombies"
(Distress Oxide background)

"Mediocre"
(Matt & Shine background, along
with some white ultra thick embossing
powder and some silver sparkles)

"Nice package"
(Matt & Shine background.   Sorry,
couldn't help myself.  Actually, not
sorry at all.)

"Deck the halls"
(Matt & Shine background)

"Santa Claws"
(Distress Oxide background)

Sunday, November 10, 2019

TEXTURED ALCOHOL INK

Alcohol ink is normally used on a smooth background but it can look amazing when used on a textured background as the ink will run along with any barriers that it meets and can pool in unexpected ways.  The addition of Pinata metallics adds another level of interest.  These samples are all created on gloss card stock and the texture is plain old white Elmers glue that has been heated to cause it to puff up, pop and ooze.  Take care not to burn the card.

"Shopping"
(The metal heartbeat embellishment is normally
silver, but has been made a gold colour by using 
the Pinata Brass over it, as it will stick to metal.)

"Fear"

"Volume"

"Melody"

"Sleep"

Below are some sample pieces before any addition
of pictures/embellishments so you can see
the texture.


Tuesday, October 29, 2019

ECLIPSE TECHNIQUE

I've been wanting to do the Eclipse Technique for quite a while.  I just had to wait for the supply of skinny 3mm wide black and white foam strips and the little tiny black square foam pieces before tackling it.  As ATC's are so small, you have to be very selective about what type of die you can use on it.  The usual way of doing Eclipse has been to do a name using large letters across a card.  So the little die-cut letters on the first sample are only 3cm high and just fit on the ATC.  You can use either black craft foam under your die-cut shapes or alternatively, as I have in some of my samples, use the skinny foam strips and squares to raise the die-cut shape up.  The important thing to remember is you are cutting your die shape from your existing background, then placing it back into the same space, but raising it.  You also need to make sure that you keep any little bits that come out (like the triangle in the letter "A" and the oval shape from the "U" as you need to replace them to give the background continuity).  The shape can be as simple as the oval shape in the 2nd example, "Magic", which is the oval shape cut from a stamped image on the background.  Or a more intricate example like the gravestones in "Wicked" below.

"Far Out"

"Far Out" side view

"Magic"

"Magic" side view

"Neverland"
(The fairy is stamped onto the jar die shape
before putting it together)

"Time Flies"
(Same jar as before but this time it has
some flies in it)

"Wicked"
(Vellum ghost placed over raised
gravestones... a bit fiddly this one and
to make the gravestones stand out,
I've drawn around the edges with a 
fine black marker.  Unfortunately
you can't see the dimension, but it's
there, trust me!)

 "Hot Mess"

This final example is not an Eclipse one but I wanted to post it for the moon shape.  I was trying to find a good moon die-cut and they are all just circles or crescent shapes.  I wanted some texture to it.  So I cut a circle from white card, spritzed with Perfect Pearls spray to give it a little shimmer, dried it, then ran it through the 3-D embossing folder called "Bubbles".  This created some craters in the moon.  I then added a little shading with Hickory Smoke Distress Oxide Ink on a sponge and raised it with foam tape.  Perfect moon!

Tuesday, October 15, 2019

DIE-CUT FINISHES

Die-cut shapes and images are always a great way to add either a focal point or embellishing an ATC or card.  These are just some of the ways I have used to add a finish to these samples.
  
"People"...
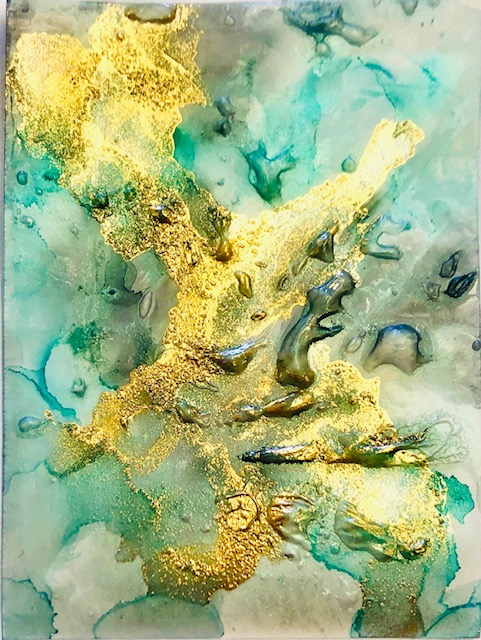
1.  UTEE (Ultra Thick Embossing Enamel) is a chunky embossing powder that you can use 
to just coat the die-cut, or you can also stamp into it while still hot to create texture.  The
background is Paper Mill alcohol ink on photo paper.
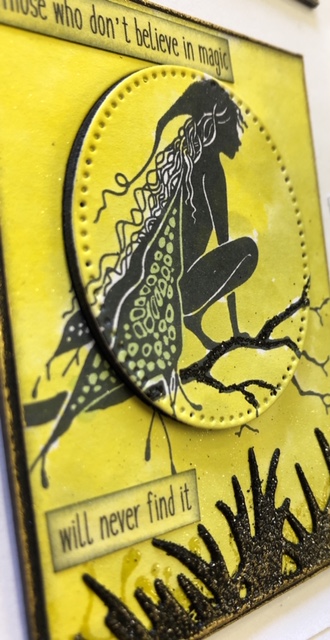
"Forecast"...
2.  Cut your shapes from black card, then rub over metallic wax or 
metallic paint over sections of the die-cut shape to add interest. The
background is metallic paint smoosh technique.

"In memory"...
3.  A simple die cut from plain black cardstock and left as is.  
It highlights a brighter background beautifully.  The background
is from the last class, Shimmer Pens 2 and is made using the
Nuvo Glitter Markers.

"Lose hope"...
4.  Die-cut a background die and then colour with Black Spectrum Noir shimmer pen 
which adds a subtle sparkle finish.  I also added silver to the star shapes on the die-cut with 
a Nuvo Silver Glitter Marker which was then coated with Glossy Accents.  Silver and 
Grey sequin stars were also added to the galaxy style background to continue the theme.

"Soul"...
5.  Another black die-cut background over the top of a Distress Oxide 
background piece.  I rubbed Treasure Gold metallic wax on the black of the
die-cut to give it some highlights and a subtle change of colour.  

"Beauty"...
6.  Another background die that was cut from plain black card, then coated
with 2 coats of UTEE black embossing powder.  This gives a wonderful
deep, glossy, black finish to the die-cut.  I have attached it using the
Tim Holtz Tiny Attacher with the staples coloured in first with a
black permanent marker.  This is a trick I use frequently, colouring
in a row of staples to co-ordinate with the ATC I am using them on.
The background is Nuvo Shimmer Powder in the colour, Catherine Wheel.

Monday, September 30, 2019

SHIMMER PENS #2

Once again this class is all about the shimmer.  Nuvo Glitter Markers, Wink of Stella and Spectrum Noir and the 3 types of pens I have used to create these shimmery backgrounds.  Anything glittery, shimmery or metallic is extremely difficult to photograph as you don't get the full effect of tilting your piece to hit the light, and then have the amazing shimmer revealed.
These backgrounds are created by placing some of the shimmery ink from the pens onto a piece of acetate, spritz very lightly with water to make them a little wetter, then dabbing your piece of watercolour card into the shimmery puddles.  The water will dilute the shimmer down somewhat, but if you dry it first, then put some of your clear Wink of Stella or Spectrum Noir down onto the piece of acetate (after it's been cleaned of the previous colours), then dab your card in again, it will really shine!

"Creepin' it real"...
(The ghost is a white card die-cut that has only
been coloured using the silver Spectrum Noir
Shimmer pen.  I went over it a couple of times,
letting it dry each time to get the mottled effect.)

"Seas the day"...
(The jellyfish die on the right has Glossy
Accents in it to get that raised, wet look.)
 

"Alien stuff"...

"Collect moments"...
(Not sure what happened with this one?  Pink?
Butterflies?  So not my style, but at least it all co-ordinates
nicely.  😲😏)

"Half spent"...

Sunday, September 15, 2019

SHIMMER PENS #1

I recently bought some of the Nuvo Glitter Markers and loved the amount of shimmer in them.  I also have some Spectrum Noir and Wink of Stella shimmer pens.  Previously, I had only used them for adding colour to stamped or die-cut images but by scribbling some out onto a piece of acetate and then using a water brush to pick some up, you can create wonderful watercolour looking backgrounds that shimmer amazingly.  This technique needs to be tried out as the computer/phone screens just don't do these atc's justice in the shimmer department.  You can see a little better how much shimmer you can get in the one called "WTF" as I happened to catch it in just the right light.  If you do this technique and there's not enough shimmer, you can use your clear shimmer pen over the top of the coloured areas to add even more clear shimmer as it won't affect your colours underneath.  Try it... you'll like it.  😎

"Moon"...
(The shadow behind the bat over the moon is
created by raising the bats up with foam tape)

"Smile"...
(The skull is one of the pieces I made using
last fortnight's technique of Stucco Gesso)

"Different path"...
(The shadowing behind the bird is created by 
raising the bird up on foam tape)

"Deeply Creepy"...
(Both the moon and the ghosts were added after
by stamping the shapes with Versamark, then brushing
Perfect Pearls in Pearl over them)

WTF?

This last one is from the Embossed Gloss Stamping class a couple of fortnight's ago, but this one has no stamping in the background.  I just did the water/powders/embossing steps straight onto the gloss
card.  I really wanted to use the die-cut shapes I had bought and these colours worked perfectly.

"Wish"...

Tuesday, September 3, 2019

STUCCO GESSO

 Gesso is a great way of adding texture to your backgrounds or even your die-cut or chipboard shapes.  I have used both black and white gesso on these samples below.  If you're using white gesso on plain white card stock, then once it has dried, you can colour with a quick swipe of Distress Oxide Ink Pads, then spritz with a little water to get the colour to run (& blend if you have added a couple of colours).  The trick to getting lots of texture is to apply the gesso randomly and not too thick all over, you want varying depths of the gesso.  Then hit it with the heat gun to dry it.  It will cause it to dry much quicker but will also give the added bonus of bubbles which, when dried, will flatten down a little but will still be very textured.  I have also used black gesso on black card, then instead of Distress Oxides, I have simply gently swiped over my clear embossing ink pad to just get the high points of the texture, then dump on embossing powder and heat.  This is how I've created the crow in "Terrors" below as well as the bird on "Scenic Route", but on that one, I used white gesso on chipboard.  Have a play.  😊

"Terrors"...

"Scenic Route"...

"Nocturnal haunting"...

"Made in China"...

"Vogue"...

"Glorious Mess"...

Thursday, August 22, 2019

EMBOSSED GLOSS STAMPING

This technique combines a few of my favourite things, stamping, embossing and Nuvo Shimmer Powders (or Cosmic Pixie Powders/Brushos).  Because I was going to be using the Shimmer Powders with water, I needed to have the stamping done in Archival Ink instead of just reaching for my usual Distress Oxide Ink Pads.  I recently bought the 3 sets of the mini Archival Ink Pads in the Distress colours and I'm so glad I did!  They are wonderful colours as you can see below in the stamping.  These were stamped on gloss card, then after the stamped image had dried I spritzed on some water and added some of the Nuvo Shimmer Powder.  Next, I tapped off the excess water then dumped clear embossing powder over the whole thing.  No embossing ink was used, the water was enough to hold the clear embossing powder which I then heated to create the gorgeous glossy, speckly effect.  It turned out with a rough texture as some of the water had dried and the embossing powder wasn't stuck to the whole card, just sections.  The other thing I noticed was that the stamping seemed to create a resist type of effect too!

"Poke the dragon"...

"Figureoutable"...

"Edible"...

"Melts in your mouth"...

"Science puns"...