Tuesday, November 27, 2018

DISTRESS OXIDE WRINKLE

Our last class of the year, is, as usual, a Christmas themed class.  This is a particularly easy background technique using the Distress Oxide Ink Pads and Glad Wrap (plastic wrap) to create the subtle wrinkle background that shows just how amazing the Distress Oxide colours are.  I applied the Distress Oxide (usually 2 colours only per gloss card), either by brayer or direct from the pad, then spritz a piece of Glad Wrap and lay down over the card, smooshing with your fingers to create the wrinkles.  You need to let it dry but as you don't use very much water, it dries pretty quickly.  Peel off the Glad Wrap and it reveals a gorgeous soft background.  I had a lot of fun looking for pictures and sayings for these Christmas themed atc's and have made up a Christmas sheet for the girls in class so they too can have Jason Momoa as a very non-Christmas Santa.  🤤🤤🤤

"Prosec-ho ho ho"...

"Ignore you"...

"Your soul"...

"Over-eating"...

"Shark!"...
(love this one)

"Not Santa"...
(& yep, this one as well)

Saturday, November 10, 2018

ALCOHOL INK LIFT OFF TECHNIQUE

I have had my Ranger Alcohol Ink Lift Off Pad for a while now but have only just got around to having a play and it is SO addictive!  There are plenty of YouTube video's on how to use it so I won't go into that here but I will say that your stamps need to be squeaky clean before you use this ink pad.  I generally wipe my stamps over with a baby wipe after stamping with them but they need more intense cleaning than just that.  If you have a stamp cleaner, use it to get your stamps as clean as possible.  My poor Lift Off Pad now has some darker marks on it from a stamp that had been used with Stazon.  Even though you think it's clean, this ink pad will cause the Stazon to reactivate a bit so you'll get some transfer to the pad.   Clean your stamps!
I have included a couple of the stamped images that were done on the plain white cardstock after lifting off the alcohol ink from the alcohol inked Yupo surface.  Make sure your alcohol ink on the Yupo is dry too before doing this technique.  Hope you enjoy the samples as much as I enjoyed making them.  Couldn't seem to stop.....  😉

"Boo"...

 "Boo 2"...
(See that white stuff?  That's stretchy cobweb from a 
Halloween pack!)

"Music speaks"...

"Solstice"...

"Hum of bees"...

"Scarlet Tree"...
(Stamped images from the Solstice card above)


The stamped image from Hum of bees above.

Stamped image from Music speaks above.

Below are the last 2 samples from the previous Brick Wall Background from last fortnight. 
Do you love my ants?  

"Uninvited guest"...

"Shhhh"...

Sunday, October 28, 2018

BRICK WALL BACKGROUNDS

The class for this fortnight is a very textured, dimensional background using glue, chipboard, tissue paper and paints.  It's a pain cutting all the little bricks out but so worth it in the end when you see the wonderful result!

"Keep Out"...
(the skull is a die-cut that I coated with
several layers and colours of the Seth Apter
Baked Texture Embossing Powder range)

"Don't grow up"...

Too glam"...

"Whimsical"...

This is what the background looks like before anything has been added.  As you can see there is loads of texture and various colours to make this particular background look like aged bricks. 

A side view so you can see there is quite a bit of depth to this.

On a personal note, I missed last fortnight's class as I had a tragic and mind-numbing event happen to our family.  My youngest brother passed away from a massive heart attack.  At the end of September, my brother Tony celebrated his 54th birthday and just 3 short month's ago married his partner Bill, of more than 20 years, when same-sex marriage was finally legalised in Australia.  He was the fittest member of our family so this came totally out of the blue with no warning signs at all.  It has left a huge hole in our large, close-knit family but his death has also affected many others as he was also a skating coach/dancer/choreographer/costume designer and was well known in Perth entertainment circles for his various productions that he staged.  He was also the jokester of the family, always quick with a funny story or meme that made us all smile.  He was also a baby brother, a son, a brother-in-law, an uncle and a great-uncle.  Tony will be missed by all whose paths he crossed.


Tuesday, October 2, 2018

CRAFT FOAM WITH FOIL

This technique has chewed up a huge amount of time trying to get it to the point where it's easy enough for the girls to do in class.... and leave some of their hair intact!!!
The very first time I did this technique, easy peasy, worked very well and no messing about.  Now when I want to teach it as a class..... well, that's a different story.  Finally got the recipe of 1mm craft foam and using the packing stuff that comes with some stuff through the mail, and it worked well enough to consider it for a class.  I did work out though that the more solid the shape, the better things went.  Anyway, I went a bit overboard on my Zombies because, how could you not, love the Zombies.  💜💀

"Biggest fear"...

"Cawed"...

"Brains"...

"Shittake"...
(This one doesn't have the foil on the black mushrooms,
it's just the black craft foam with adhesive on the back, with
a little antique copper paint rubbed on to it)

 "Uninvited"...

"Saltwater"...

"A poem"...


Sunday, September 16, 2018

EMBOSSING FOLDER OXIDE BACKGROUNDS

Is there nothing that Distress Oxides can't do?  These are backgrounds that are made by pressing Distress Oxides onto one side of an embossing folder, placing gloss card inside and running through your die-cut machine.  The reason you use gloss card is it will spread the colour really well though you do need to buff it after to get the excess pigment off.  You need to clean your embossing folders as well straight after you've used them so you don't forget and transfer the ink to another project.  No water was used in this technique as the ink is wet enough to transfer around the card by itself.  I put the ink on the side where the design is recessed, that way the design stays white as no ink goes into the recesses.  

"Antiques"...

"Go with the flow"...

"Creep it real"...

"Too glam"...

"Without dreams"...

Friday, September 7, 2018

EMBOSSED SOOT

Soot technique has always been a favourite of mine, such a simple thing as gloss card stock, a candle and a clean stamp, some fixing spray and you have the makings of a wonderful atc or card.  To change things up a bit, we'll be embossing an image with clear embossing powder first, then maybe add a little colour (sponge on Distress Oxides), then add the soot.  At this point, you can't touch any of it as you'll just leave fingerprints so you carefully wipe away some of the soot where you want to reveal either the white (now light grey) card underneath or some of your colour you sponged on.  When you're happy with how it looks, spray with fixative and let it dry, then it's all done.  Simple but very effective.  Add your chosen embellishments to go along with your stamps and it's a quick and easy technique.

"Saltwater"...

"Find your wings"...

"Black"...

"Brightest Star"...

"Darkness"...


Finally, this is one from the last class where we used foil on top of mostly dry alcohol ink.  For that class, we used Yupo with the alcohol and foil but below is a sample that I made using black gloss card, then the alcohol inks, then the foil.  It has an amazing depth that the computer just can't capture.  I used a fine Zig pen to lightly outline the die-cut shapes, then when tacky (about 1 minute), pressed some silver foil on to them.  It really makes the shapes stand out from the background!

"Eternal"...

Saturday, August 18, 2018

ALCOHOL INK SHIMMER FOIL

As if alcohol ink on Yupo paper isn't amazing enough, when you add foil, it takes it to another whole dimension!  You may have discovered yourself that sometimes the alcohol ink is still tacky on your Yupo for a while after spreading the inks around, this means it's perfect for transferring foil onto the tacky spots.  There is a "sweet spot" where the ink is tacky but not too wet and before it totally dries so no foil will stick.  I find it's about 1-1/2 minutes.  But this will depend on what colours of inks you use (weird I know but reds seem to stay tackier for longer) and also how much Blending Solution you use in the ratio to inks.  Blending Solution I found works better for this technique than just isopropyl alcohol but if you don't have Blending Solution or even if your inks have dried and no foil is sticking, you can always resort to the Zig fine tip two-way glue pen.  This is how I've added the gold foil lines in the very first example below as it had dried beyond where the foil would stick.  

"Fat crying"...

"Sparkle"...

"Dead leaves"...

"Life update"...

"Classy AF"...
(sorry, not sorry if it offends 😏)

Tuesday, August 7, 2018

BABY WIPE STAMPING

Baby Wipe Stamping is a technique that has been around forever and it's a great way to utilize those re-inkers that tend to just sit in their box gathering dust.  It's simply a matter of adding a few drops of 3 or so different coloured re-inker onto a folded baby wipe and then stamping onto it.  A nice effect without the cost of having those multi-coloured inked pads and the added bonus of you can choose whatever colours you want to put together!  With the addition of some other focal stamps that you can colour, or by adding some die-cut shapes, it makes for a nice change to plain old boring black stamping.  To keep continuity between all of your elements, I try to repeat the colours that have already been used in your multi-coloured stamping to help tie it all together.  This is most evident in the colours I've used to colour in the girl and her clothes on "Reality".

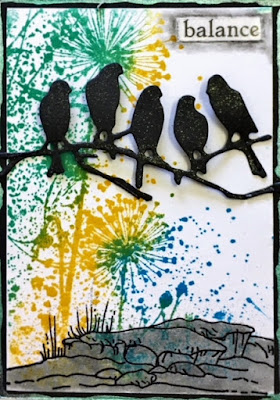
"Balance"...
(Die-cut bird shapes have been slightly raised with
black foam tape but the branch has been stapled
on with black staples so you can't see them.  Both birds
and rocks down the bottom have been coloured with
Wink of Stella glitter brush pens, very subtle touch of shimmer.)

"Reality"...
(I stamped the bugs with the baby-wipe stamping method
and then drew around the shapes with an extra-fine sharpie.) 

"Depth of Life"...
(The steampunk dragonfly has been cut from black card
stock, then embossed with 2 different colours of black
UTEE mixed with Perfect Pearl Powders that makes
a gorgeous extra-thick embossing powder with shine.
The German Scrap down the bottom was also coated with
the gold UTEE mixture.)

"Melancholy"...
(I love how gorgeous this stamp looks using this technique!
The seam binding tape was coloured using co-ordinating
colours from the Distress Ink range and then stapled on.
See the little dotty specks on the card?  If you put your stamp
back down over your stamped image when it's dry, you can
then flick some watered down ink in the same colours as your
stamped image and the stamp will protect your image.)

"Karma"...
(Spiderweb stamped with Barn Door/Hickory Smoke/Spiced Marmalade.
Die-cut spider cut from black cardstock then coated with a mix of Black 
Utee and Pewter Perfect Pearl.  I stopped heating it before it was all totally
melted to get that gritty texture that's happening on the spider's back).