Sunday, November 29, 2015

PEARLIZED PAINT

This will be the last set of classes for 2015 and with Christmas fast approaching, I thought we'd do a background that was a little "festive" where we could use some Christmas images and tinsel that is small enough for these atc's (would also be good for cards too!).   The tinsel is generally available at places like Spotlight in Australia or even Riot Art (also in Australia) has some too!  It's easy enough to attach it using the Ranger Tiny Attacher, especially if you colour your staples with a coloured permanent marker beforehand (like a Sharpie) to make them blend in.  

Be warned, the first 3 are PG but the last couple are definitely MA (15+), especially the last one.  Sorry, couldn't help myself... actually I'm not sorry, I think it's funny, but smutty.  :-)

"Dear Santa"...

"Merry as I get"...

"Tinsel in a tangle"...

"Ho's"...

"Jingle my bells"...

Tuesday, November 17, 2015

BRUSHOS BACKGROUNDS

The girls in my classes have just been exposed to the wonderful product that is Brushos.  These are a highly pigmented powder that is sprinkled sparingly on watercolour card (or glossy!) and then spritzed with water to see the gorgeous colour bursts.  You can of course spritz with water first and then sprinkle them on, this gives a different effect.  Over the next book which starts in January 2016, we'll be visiting this product several times as there are multiple ways of playing with them.  This technique of just making Brusho Backgrounds is our first foray into the Brusho world.  

The most amazing thing about them is you can get multiple colours come to life from just one single colour as they are made up of multiple pigments to create the single colour.  If you sprinkle then spritz just one colour, you'll see other colours (some that you least expect) randomly appearing.  However, if you sprinkle some on a non-porous surface (like a piece of laminate or similar), then mix that with a wet paint brush, you'll get the single colour that is described on the bottle.  

A hint... don't open these bottles, simply push a skewer into the top so you can sprinkle like a salt shaker and then plug that one hole with a Pop Rivet.  Down the bottom is a picture of mine also showing how I've done a colour swatch and stuck it to the pot so you can see what you're working with.

"Simply a line"...

"Confused"...

"Mystical Qualities"...

"Essence"...

"Wanty"...

This is my box of Brushos and you can see the pop rivets in the top 
and the colour swatches on the lids.

Finally, the last atc from the previous class, Embossed Stencils.  Love my branch die!!!

"Nevermore"...

Tuesday, November 3, 2015

EMBOSSED STENCILS

The technique for this fortnight is a background technique that is once again using either JAC paper (double-sided sticky paper) or a Zyron machine (one that will cover either 2-1/2" or 5") to add sticky to our card stock to create a beautiful background using stencils and embossing powders.   It is best to use contrasting colours of embossing powders so the design of the stencil will stand out from the background embossing.  Place your chosen stencil down over a sticky background taking care not to touch the exposed sticky with your fingers,  Sprinkle your first colour of embossing powder over the whole card, (this is your background colour), carefully tap off the excess and remove the stencil.  Then sprinkle the second contrasting colour of embossing powder over and it should stick to the exposed sticky bits left that your stencil protected.  Tap off excess and heat!  A wonderful metallic background that once again, the computer does no justice to.

"Organic correspondence"... 

"Fright Night"... (this one has an
extra layer of clear utee over it)

"Aim for the moon"...

"Wicked intention"...

Friday, October 23, 2015

TILED ATC'S

This fortnight's technique is called Tiled ATC's because they look like tiled pictures with grout in between.  The grout is actually embossing powder and though this technique is a little fiddly, the effect is wonderful!  The tiles are labels that have been coloured with Distress Spray Stains or Distress Ink pads and then stamped onto with Black Stazon or black Ranger Archival Ink.  They are then attached to a sticky sheet of card stock (either JAC Paper or run through a Zyron machine to get the sticky card) and the labels are then attached.  Embossing powder is poured over the top and it will stick to the exposed sticky between the labels.  Heat and you have tiled atc's!  

"Good Chance"... (Twisted Citron and
Smoked Hickory ink pads)

"Editing"... (Chipped Sapphire, Broken China,
Tumbled Glass and Victorian Velvet ink pads)

"A fine art"... (Brusho's on this one!)

"Ranuncula"... (Peeled Paint, Picked Rasberry
and Barn Door ink pads)

"Haunting"... (Stormy Sky and Rusty
Hinge Distress Spray Stains)

"Intellectual"... (Crushed Olive and Rusty Hinge
Distress Spray Stains)

Tuesday, October 6, 2015

MARBLED EMBOSSING

The technique for this fortnight is one that utilises chipboard pieces, coloured embossing powder, clear utee powder (Ultra Thick Embossing Enamel is what UTEE stands for) and Perfect Pearls.  Seeing how I got the girls on a bit of a Perfect Pearls kick, figured we could continue with those little pots of coloured powder and use them to make Marbled Embossing on chipboard.  I mucked around in my studio trying to work out the best way to do this without the perfect pearls blowing all over the place.  For this technique you're going to need a low blow heat gun.  The normal Wagner or Milwaukee black heat gun I prefer for embossing isn't going to cut it this time!  So it's the Ranger Heat Embossing Tool that's the best one for this particular technique.  The layers consist of blackening your chipboard with either permanent marker or black soot Distress Stain, dry, press into clear embossing ink pad, emboss with chosen colour of embossing powder, heat, cool, clear embossing ink pad again, clear utee, a little perfect pearl of chosen colour sprinkled on, then heated.  The perfect pearls melts along with the clear utee to make gorgeous marble like effects.

Lots of steps I know but the results are just gorgeous in the flesh.  Once again the computer screen lets the side down with the average images, but some idea of how it looks is better than no idea!  :-)

"Flighty".,. (Background is the Plastic 
Parchment Background and the 
embossing is done on the rectangular 
chipboard frame.)

"King"... (Firstly let me say this in no way
reflects my thoughts on my husband, 
he's more like the King of Good Husbands!  
Background on this one is the 
Canvas Resist Technique and the embossed
pieces are the 3 crowns at the top.)

"Sister"... (Background is the 
watercolour drip from
the last book, the heart is
the embossed piece.)

"Nature concentrated"... (This background
is from the Foil Class and the bird
is the embossed piece.  You can
clearly see the perfect pearls in
Gold & Mint in this piece.)

"Obsessed"... (Background is just a distressed
background using green & copper paints and the
square with the word on it is the embossed piece.  
Sort of hard to see here as I also used some Copper Liquid 
Pearls to blend the word in a bit, but this one is 
a green background with copper Perfect Pearls.)

This one is from the previous technique that we did, 
Wax Paper Fresco
(Solemnly swear)...

Tuesday, September 22, 2015

WAX PAPER FRESCO

This is another background technique that uses a few products we've used before in our classes.... Wax Paper, Embossing Folders and an embossing machine (Big Shot or Cuttlebug etc.) and Distress Ink Pads.  I have also utilised some Angelina Fibre in this class as well although it's pretty hard to see.  It's on the first atc, Bling out your dead and I've captured some Angelina Fibre in copper between the card stock and the waxed paper before I've embossed and coloured it.  I've also added some loose fibres underneath the picture.  Unfortunately this is another of those atc's that has to be seen in the flesh to appreciate all the shimmer of the fibres.  Yes girls in my classes, there is a new quote sheet out, number 22!

"Bling out your dead"...

"Drama Llama"... (I've also used some
Angelina Film under the image on this one
and across the front of the image too)

"Picturesque"...

"Unloved flower"...

Tuesday, September 8, 2015

FABRIC BACKGROUNDS

A simple class this fortnight using some of my stash of quilting cotton fabrics as backgrounds.  I like the contrast between the stark black and white images (that can be coloured in or left black and white) against the brightly coloured fabric background.  As long as you use a good quality 
double-sided tape to attach your images to the fabric, they will stay there with no drama 
(I use Stylus brand double-sided tape exclusively as it is just so good!). 

The stamps below are all from Stampotique and I just had to use my new little
dog cube which has four little mutts on it.   You can use whatever
you want for embellishments and the first two atc's below both have hearts
that have been covered with Angelina Film and then heated.  The wings
on the very bottom atc "Ethereal Spirit" are also German Scrap
wings that have Angelina Film adhered to it and then heated.

"My dog"...

"together forever"...

"Mesmerize"...

"Ethereal Spirit"...

Friday, August 28, 2015

ROCK SALT PEARL BACKGROUND

In a previous class we have used Rock Salt to create gorgeous background effects.  In this class, we'll be using Rock Salt as well as Table Salt but to mix it up a bit and give a lovely shimmer, we'll be adding some Perfect Pearls to the salts.  Because the salt/Perfect Pearl mix is dropped into liquid, the water acts as a setting agent for the Perfect Pearls so they won't rub off.  I used Distress Spray Stains to do the backgrounds as they are both vibrant and wet enough to place the salt onto straight away.... but if it starts to dry before you ready, simply spray with a little water.  The salt acts like a wick and draws up the surrounding moisture to leave intense colour concentrations and the little bit of shimmer from the Perfect Pearls is just an added bonus!   I love how this first one below took on a rust-like appearance... all on a humble piece of watercolour paper.  Although, this technique will work on gloss card stock as well, the "Beautiful Life" atc below is on gloss with no Perfect Pearls added, just the salts!

"Only the young"... (Rusty Hinge & Smoked Hickory)

"Have no fear"... (Vintage Photo and Stormy Sky)

"Controlled"... (this time I used Gelato's, water and salt 
to create this background!)

"Untie the ribbons"... (Evergreen bough and Black Soot - be careful
using Black Soot as it can overpower other colours!)

"Beautiful life"... (this is the gloss card background
with no perfect pearls, just Broken China, Twisted Citron
and salt)

The images below are just the backgrounds before anything
has been added to them.  I find it easier to work on a size that is
2 or 3 times the size of atc's and then cut them up, so approx 18cm x 7cm 
(or 7" x 2.5").

Rusty Hinge & Smoked Hickory

 Vintage Photo & Stormy Sky

Gloss Card - Dusty Concord & Spiced Marmalade

Evergreen Bough & Black Soot.

Tuesday, August 11, 2015

FOIL STAMPING

Using Foil in stamping is another of those techniques that seems like it's been around forever!  There is a resurgence in interest in it though and there are now several ways to apply foil to your projects.  Of course the simplest way is to use a glue that will dry with a tacky surface that you then apply the foil to.... I like to use the Zig two way pen.  When you apply it it is wet, allow it dry for a few minutes (around 5 or until it goes clear-looking), place the foil (coloured side uppermost) on to the dried glue and press lightly with your fingers, rub over gently and when you lift the foil it will have transferred to the glue.  This same technique is used with the Ranger Sticky Embossing Powder, only you can stamp an image with an embossing ink, tip on some Sticky Embossing Powder, tap off the excess as you would any normal embossing powder and then heat it with a heat gun.  You only have around 30 seconds or so to get the foil onto the project so be prepared beforehand!  This is like a sticky glue so it will also adhere other things (like flocking, microbeads, glitter etc).

I have also experimented with my laminator.  Now I know that to laminate an image with foil you're supposed to use a laser printer to print your image, then run the image through the laminator with the foil on the top to adhere the foil but I tried it a different way.  I stamped an image with clear embossing powder, heat set it and then ran that through the laminator with a piece of foil over the top (enclosed in a piece of plain paper first to protect the foil) and it worked perfectly!  So you can see there are a few different ways of using foil and as it doesn't scan very well, I've shown below the samples with the scanned image first, then a shot I took with my iphone where I've turned the atc to the light to get the reflection of the foil to show up.

"Enchant"...


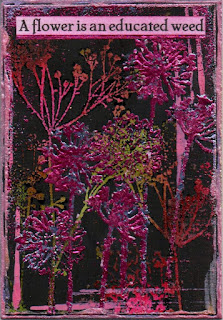
"Educated Weed"...


"Oh look"...


"Let's pretend"...


"Luminosity"...


"Black & White World"...


These last two below are the final samples from my previous class - Tyvek.  Loved this class!

"Right decision"...

"Solution"...