Tuesday, February 26, 2013

Goosebumps Texture Spray

Goosebumps Texture Spray is a little bottle of clear texture that also acts as a resist.  It dries quite quickly but can also be dried with a heat gun and works wonderfully when used in conjunction with the Ranger Distress Inks and sponges for application.  In the first atc below, Germinate, I stamped first with Ranger Archival Black Ink and then spritzed with the Goosebumps, then applied some Glimmer Mist in Turquoise.  I then used a damp paper towel to wipe off the Glimmer Mist from the sprayed area of the Goosebumps.  Love the effect!!!  The others were done using the Distress Inks and sponges after stamping and spraying with Goosebumps.  I'm going to have a bit more of a play and see what else this little bottle of magic can do!

"Germinate"...
 
 
"Wringing good out of evil"...
 
 
"Conservative"...
 
 
"Life's moment"...
 
 
Below are some more samples from the last class - Antique Paper.
"Lifetime memoires"...
 
 
"Every second"...
 
 
"Writer"...


Finally, a couple more from the Faux Dominoes technique that was the class before Ancient Paper.
 
"Party Girl"...
 
 
"Oddity"...


Sunday, February 10, 2013

Ancient Paper

The technique for this fortnight is called Ancient Paper.  We'll be using Ranger Distress Ink Pads, Glossy Accents (or Dimensional Magic) and the base that we're working on is the humble brown paper bag.   This techique makes a surprisingly strong piece of paper because of the addition of the Glossy Accents, strong enough to actually even die-cut shapes out of it if you choose. 
 
"Living Hearts"... (love corrugated card & microbeads together!)
 
 
"Snow White"...
 
 
"Innocent"...
 
 
"What is art"...


Finally an atc from the last class, Faux Dominoes, "Unique"...
(The corrugated card down the sides is glimmer misted cardstock run through a paper crimper!  Works perfectly if you don't have the right colour of corrugated card to co-ordinate with your work.   Drag that paper crimper out that's lurking in the bottom of a box somewhere in your craft room and put it to use.)


Monday, January 28, 2013

Faux Dominoes

The second technique for Book Number 9 is Faux Dominoes.   I have used both the large and smaller sized real dominoes on atc's before but I've found they are harder to get hold of these days so I wanted to do a similar look but with products that are easily available.   So these are made from plain white cardstock, stamps, some form of colouring (distress ink pads, distress stains, distress markers... seeing a theme here???), then covered with clear embossing powder for a beautiful glossy finish.  Raising the pieces on foam tape also adds to the illusion of depth, which is why the backgrounds are not as clear as the raised areas.  As you can see I've used different backgrounds from my various techniques that I've taught over the years and they are mostly covered up but I still like to use handmade backgrounds over a purchased piece of scrapbook paper, unless of course you do something to said scrapbook paper....stamp, ink, emboss, paint etc.

"Certified Freak"... (painted canvas background)


 "Eternal Oblivion"... (corrugated card background)


"Art"... (credit card technique background)


"waiting"... (painted canvas background)


This one below is actually a 4" x 6" card rather than an atc so the domino pieces are made larger.  I occasionally make a card to show my students that you can incorporate the techniques they learn in my classes into cards, not just make atc's with them.  As you can see, this is a perfect example of a particular technique that lends itself wonderfully to a card.  

More samples to follow after my classes.

Saturday, January 12, 2013

Antique Faux Metal Embellishments - New Cover!

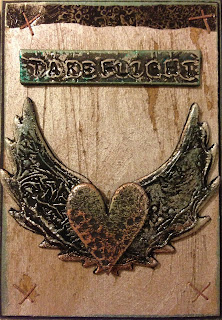
So begins a new year, which means for my students... a new book cover for our Technique Books.   This class the technique is called Antique Faux Metal Embellishments and it works on chipboard pieces or those laser-cut shapes equally as well.   It's a spin-off from the soot technique but with another couple of steps thrown in and the pieces end up very glossy (that's the Dimensional Magic or Glossy Accents that gives that look) but very antiqued, like old metal jewellery.   The important thing with this technique is you need the pieces of chipboard to be large enough to actually show the wrinkles that the Gilding Wax or Treasure Gold (or Rub'n'buff) highlights.  So no little squiggly flourishes, you want solid pieces.

This is the book cover in it's mid-way stage, it's not finished as I'll continue to work on it at each class over the next fortnight to show my students how each step is done.   Some people are much more visual than others and the demo is, as far as I'm concerned, a very important part of teaching.  You can tell by the size of the wings and chipboard corner piece on this cover that it wouldn't work on little skinny pieces of chipboard embellishments.   This cover is 6" high by 8" wide (or 15cm x 20cm).  The background is a piece of the Glimmer Mist Wrinkle from the previous class.

I took a picture of the cover with my scanner as well as my phone, the colouring is closer to the one on the scanner (the top one) but the detail shows up better in the phone picture.  Just thought I'd include both....amazing how different it looks!   The Book 9 wording is a Cuttlebug letter die-cut set and it's the aluminium foil tape stuck to chipboard, then cut out and a bit of black acrylic paint applied and wiped off randomly to dirty the shiny silver look of the letters.   After I stuck them down with Matte Accents I used a charcoal pencil and a cotton bud to smudge around the edges to give them depth.  The heart in the centre is not done with this particular technique that we're doing in this class, it's simply a chipboard heart painted black, bashed with Tim's texture hammer (not too much though) and then Gilding Waxes rubbed lightly over the surface.

Book cover... taken with scanner

Book cover ... taken with phone
 
Close-up of Antique Faux Metal Embellishments - the wings, not the heart!

"meditating in solitude"...

"new beginnings"...

"truth"...

"truth - close-up of embellishment"...

"take flight"... (these chipboard hearts & wings are from the Collections range!)

"a little bird"... (the egg is the embellishment and also comes from Collections chipboard range)

More to come....

Tuesday, December 4, 2012

GLIMMER MIST WRINKLE

The last technique for this year is Glimmer Mist Wrinkle. The technique using wet paints, sprays etc and then placing plastic wrap (Glad Wrap or similar) over the top in a wrinkled manner, allowing it all to dry and peeling off to reveal a wrinkled background is a technique that has been around for years in the stamping/craft community. The problem I found is in a 2 hour class, you don't have time to wait for the card to dry and it needs to be dry to get the wrinkled effect as the colour is more concentrated in the wrinkled areas.
So, what does one do..... obviously you can't use a heat gun as the plastic wrap will just shrivel up and that's the end of that! What I did do was placed my pieces of card with the wrap on it while still wet, into the oven. Not too high a temperature and you have to watch out for the fan-forced ones as it wants to blow the wrap around. But in only a couple of minutes, it's dry enough to be able to take the wrap off and your card is dry and the wrinkled area is perfect! 
Below are A5 sized pieces of card using Glimmer Mists and this technique.  Using Glimmer Mists means that you have the shimmer/sparkle from the sprays collecting in all the wrinkles and it looks absolutely wonderful!  I have used some of these as backgrounds for my atc samples below.  An A5 sized piece of card will give you 4 atc backs as it's 5" x 7" in size.


"Voyage of Discovery"...
 
 
"Twirl"...
 
 
"Dramatic"...
 
 
"Just because"...
 

"Soulful"...


Finally, a couple of more samples from the last Metallic Distress Stains Class.
 
"Nymph"...
 
 
"See"...


A Merry Christmas and a safe and Happy New Year to all.... see you in 2013! (unless I get something else done over the holidays which is blogworthy).

Friday, November 23, 2012

Metallic Distress Stains!!!

So this class is all about the new Ranger Metallic Distress Stains.   I know you all love (as I do), the Distress Ink Pads and those who have ventured into the realm of Distress Stains find them indispensable as well.... now with the addition of metallic's to the Distress Stain range, well it opens up a whole new world.   To prove that yes, I can do pink and bling along with the darker style that is more my norm.... I give you "Dream"..... I used the pewter metallic distress stain to stamp onto a distress inked sponged background....gorgeous!!!
 
"Dream"...


This next one I simply swiped some distress stain onto my craft sheet, wiped a piece of white matte card through it, added some Rock Candy Crackle Paint (rock candy is clear), waited for it to dry, then sponged on some Vintage Photo, Gathered Twigs and Walnut Stain Distress Ink.
"Never Regret"...


Finally I did the ol' smoosh method of place, twist and lift of the Distress Stains & Metallic Distress Inks from the craft sheet onto gloss cardstock.  Love how it shimmers on gloss card!
 
"eat it's young"...


Lastly the next two are from my previous class using the slide windows.
 
"Breathe"...
 
 "Mystique"... (this one I covered the slide with textured gold paper!)
 
 
More Metallic distress stain samples to come....
Tuesday, November 6, 2012

Windows - Part Two

This technique uses an old product that I'm sure quite a few of us have hanging around at home, at least if not at your home, then I'm sure you'll find someone who has some lurking in those dusty boxes in a cupboard somewhere.   I'm talking about the old slide frames that came in either cardboard or plastic.  It's as simple as separating the two sides of the slide, removing the negative from inside, sticking the slide back together with a little double-sided tape and then covering with a piece of foil tape that has been embossed beforehand with either a Cuttlebug or Big Shot and your favourite embossing folders.   I have used several things to colour the foil after it's been attached  -  Alcohol Inks, Vintaj Patina Inks as well as plain old acrylic paint!   Attach a picture to the back, mount on a fabulous background and there you have it.... recycling at it's best!
 
"Rock is dead"... 
(love this Spellbinders M-bossabilities brick folder!!!)


"Obscure"...
(Vintaj Patina sponged onto the slide with no embossing used this time) 


"Angelic"...
(Paper Casting background, acrylic paint used to colour the slide)


"I tried to be good"...
(Alcohol Inks used on the slide)


"Go for Baroque"...
This next one below is from a previous class called Clear Embossing & Gilding Wax.  Love the rich look you can get with this technique and this wording just seemed to really suit.... wonder why???


"Men are from Mars"...
This one is from another previous technique called Abstract Acetate.   Might have to stick this one to my fridge so hubby gets the general gist of all things plastic and rectangular!!!   :-)


More to follow...