It never ceases to surprise me what household products are used in the pursuit of something "different" in the craft world. Years ago we used drywall tape, both the fibreglass one that has lots of little squares and also the paper adhesive type that has circles. I still have a roll of the paper circle style so thought I'd revisit it for the girls who've not used it before. It can be used as a stencil, just plain as it is or even embossed over. It's a bonus that it has an adhesive backing on it so it makes it really easy to stick down no matter what you decide to do with it. I do recommend de-tacking it on your clothing if you are going to stencil with it though so you can lift it off when you have finished adding your colouring to it. A great little accent for your background.
Tuesday, December 5, 2023
DRYWALL TAPE ACCENTS
Tuesday, November 21, 2023
WREATH STAMPING
There are templates that you can purchase to create a wreath style of stamping on a card. I chose to make one as it's a simple process and there are lots of YouTube videos available showing how to create your own. Card fronts are much bigger than ATCs so it can be a little challenging to get your wreath to fit onto the rectangular shape of an atc but it can be done, as shown by my samples below. The good thing is the same size template will also work for cards a it's all about the placement of the stamp on the door of the stamp positioner as to how small your wreath can be. Wreath stamping does not have to be leaves or flowers as is usually used. My samples show that you can use whatever small-sized stamps that you choose to. Yes, I chose bats, skulls and spiders for some of mine. I hope you give it a try, it's such a great technique!
"Excuse me"
(The black border around the edge of this atc is
created using the Distress Oxide re-inker from
my Bleeding Borders class. The gold accent
colour around the edge and on the bat is Golden
Hour Solar Paste swiped onto black. Such a
great effect!)
"Fly away"
(You can see you don't need to colour in the
background of the atc at all with this
technique. There is enough going on
with the wreath stamping and a focal image.)
Here is a closer look at the sparkle on the bee.
"Be you, bravely"
(The bleeding lines around the edge of this atc
is created with the Pilot G-Tec C4 gel pens that
come in colours and can be activated with water.
I love the Banksy sticker that makes the focal
point in the wreath and the little bootprints
were from a Christmas stamp set that I never used any
other parts of, except the boot prints.)
(This background is Supervision Layering
Watercolour paints. It is one colour that granulates
and separates into blue and purple.)

Another close-up to see the sparkle of the WOW
glittery embossing powder on the dragonfly.

"Life is good"
(Sometimes clean and simple just works.
I was pretty impressed by how small I got that
wreath on the skull's head!)
Tuesday, November 7, 2023
DRY EMBOSSED STENCILS
Stencils are an easy way to add something extra to a background and it can be as complex or as simple as you like. But did you know you can use your stencils to get a dry embossed look to your plain cardstock? The cheaper, thicker type of stencil works particularly well for this technique and you can buy a rubber embossing mat that is specially made for this purpose. I have a couple of rubber embossing mats but one of them was old and brittle so I was going to purchase another one, however I found that the silicone pet feeding or training mat from Kmart here in Australia was a perfect substitute. In fact, it's slightly thicker than the embossing mat so it works well. Two caveats, never run your embossing sandwich through twice, that is backwards and forwards, as the rubber stretches and you'll end up with a double impression and secondly, don't force the sandwich through your machine. You may need to shim to get just the right combination of cutting pads, rubber/silicone mat, stencil, platform. If it goes through too easily, you won't get a good impression on your card. I used Bristol Smooth for the card as it is reasonably heavyweight and the blending of the Oxide Ink pads on this card works beautifully.
"Keep moving forward"
(I used a Uni-Ball Signo DX 0.28 black gel
pen to draw around the edges of this stencil
after adding the colour to make the petals
stand out.)
"Plant Parenthood"
(A grey brush marker was used on two edges of
this stencil design to give a shadow effect.)
Tuesday, October 24, 2023
GEL PLATE DROPLETS
Gel plates are such a versatile tool and by using ink pads instead of acrylic paint, you can make fast and straightforward backgrounds just with a bit of water and an ink pad. I had previously tried flicking Distress Spray Stains and Oxide Sprays onto a gel plate after inking but found that using just water instead of the sprays worked so much better. My choice of ink pad was Distress Oxide ink pads and you need very little water to get this effect.
If you want to see more detail in these pics, click on the first one and scroll through as I've taken the photos in fairly high resolution. Even though these are small, the little details on atc's matter.
"Best day ever"
before cutting it down for an atc. As you can
see, you can spread the droplets out or have
them close together. I use a 5"x7" Gelli Plate.

"Two weevils"

"Go with the flow"
(The sand texture down the bottom of this atc
is Liquitex Glass Bead Gel mixed with a drop
of Antique Linen distress re-inker and then a
little silver wax rubbed lightly over the top
when dry.)
Tuesday, October 10, 2023
DIY SHIMMER PASTES
Modelling pastes and similar products have been around for a while and since Lunar Pastes were introduced, they've seen a resurgence in popularity. I personally have a few Lunar Pastes but have also seen others making their own shimmer pastes by using a gloss heavy body gel medium and adding mica powder for that extra shimmer. You can also add a tiny amount of Distress Re-inker to colour your gel medium and then add the mica powder for the shine. You need to use gloss gel medium as this will allow the mica powder to shine. If you use matte gel medium, you can still colour this with the distress re-inkers but I wouldn't use the mica powders as the matte gel medium won't allow the mica to shimmer. For this same reason, I wouldn't use Distress Oxide re-inkers with the gloss gel medium as they have a more matte appearance than the straight Distress re-inkers. There are so many videos around of how you can use the pastes and if you make your own, you only need to mix up as much as you need for your one specific project. I have a great set of 24 different colours of mica powder so that gives me many different options to choose from.
Note: A couple of my samples have also been made by mixing glass bead gel (gloss gel medium mixed with clear reflective glass beads) with the mica powder. Another great combination of products!
"Focus"
(The sunflower was stencilled using black and
gold DIY shimmer pastes. A little orange mica
spray was splattered over when dry. The
dragonfly is from the transparent wings set
from Idea-ology, Tim Holtz.)
"Gears"
(3 colours - gold, silver & orange, of Lunar Pastes
were scraped over a piece of plain black card
to create a quick-drying background which was
then embossed with an embossing folder.)
"Enjoy the flight"
(Black mica powder mixed with glass bead gel
to create the rocky foreground.)
"Fake people"
(DIY shimmer pastes through a stencil and
when dry, gold metallic wax was rubbed
over portions to give extra shine.)
(The mountain was created with the black mica
powder mixed with glass bead gel so it not only
has gorgeous shimmer, it is also very textured
with the little glass beads feeling very bumpy
when you run your fingers over it.)

"Wander"
(3 colours of DIY shimmer pastes through
a stencil for the background.)

This is a card that I made using mica powder mixed with
glass bead gel to create the base of the leaf stem as well
as the little dots on the end of the spikes. This card
really shimmers as the leaves have been painted with
the gorgeous Lisilinka paints.

Tuesday, September 26, 2023
RIMMED TAG EMBELLISHMENTS
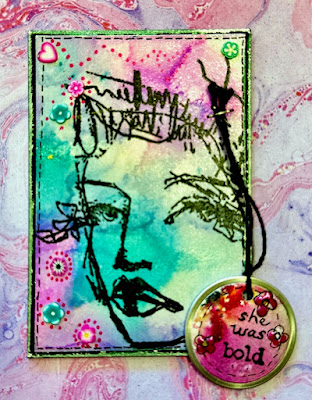
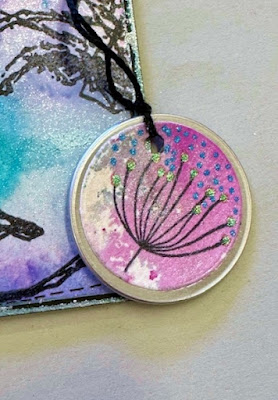
The little round metal-rimmed tags have been around in the craft world for many years and like other things, they go in and out of favour. For atc's, the tags that are just over an inch in width are a great size to add your words or short quotes to, and they give the atc a little extra 3D embellishment. Of course, they will work the same way on cards and have been used many times in junk journals as well. I have included a picture of some of the tags as well. Having 2 sides gives you the option of decorating both.
Metallic thread, embroidery thread or coloured seam binding are threaded through the holes and I used my mini stapler (Tiny Attacher) to attach them to my atc's.
"Overthink"
The back of the tag.
"I sparkle"
Tuesday, September 12, 2023
FLAT BRUSH WATERCOLOUR & SPECIALTY PENS
I've been having a play with a small flat brush with my watercolour paints and I thought I'd combine a few different products to add a little extra something to my atc's. For the colouring, I used Paul Ruben watercolours, the black fine line drawing on some of these samples was a combination of a Uni-Ball Signo DX 0.28 extra fine gel pen and a Pilot G-Tec-C4 black gel pen. The Pilot G-Tec-C4 bleeds when wet so you get a smudged effect when drawn through wet watercolour. I also used my Lisilinka Watercolour Paints, which are so wonderfully sparkly and my new set of Pentel Hybrid Dual Metallic Gel Pens which are also full of sparkle, much more than any other glitter gel pen I've used.
The technique to do these flowers can be found here on Youtube, by the very talented Maremi Simplecraft.
"Be-leaf"
(The background was created with a flat brush
while the leaves were done with a #4 round brush.)
"Fake people"
"Live in the moment"
(These stems were drawn with the Uni-Ball
Signo DX extra fine gel pen.)
"The hum of bees"
(This frond shape was also done using the
flat brush while the silver line drawing on
it was created with the Pentel Dual Hybrid gel pens.)

"Cat Lady"
(These stems were drawn with the Pilot G-Tec-C4
gel pen and you can see the bleeding where they were
drawn through the wet watercolour on the vase.)

This next one is a card I made using the same
technique to create the flower and Lisilinka
Watercolour paints to do the sparkly lines
radiating out from the centre. These watercolours
can't be appreciated unless you see them in person.
They are spectacular!

Another card using the same technique but I couldn't
resist adding extra bits to this one so it's much
more busy than the others.


