Monday, September 30, 2019

SHIMMER PENS #2

Once again this class is all about the shimmer.  Nuvo Glitter Markers, Wink of Stella and Spectrum Noir and the 3 types of pens I have used to create these shimmery backgrounds.  Anything glittery, shimmery or metallic is extremely difficult to photograph as you don't get the full effect of tilting your piece to hit the light, and then have the amazing shimmer revealed.
These backgrounds are created by placing some of the shimmery ink from the pens onto a piece of acetate, spritz very lightly with water to make them a little wetter, then dabbing your piece of watercolour card into the shimmery puddles.  The water will dilute the shimmer down somewhat, but if you dry it first, then put some of your clear Wink of Stella or Spectrum Noir down onto the piece of acetate (after it's been cleaned of the previous colours), then dab your card in again, it will really shine!

"Creepin' it real"...
(The ghost is a white card die-cut that has only
been coloured using the silver Spectrum Noir
Shimmer pen.  I went over it a couple of times,
letting it dry each time to get the mottled effect.)

"Seas the day"...
(The jellyfish die on the right has Glossy
Accents in it to get that raised, wet look.)
 

"Alien stuff"...

"Collect moments"...
(Not sure what happened with this one?  Pink?
Butterflies?  So not my style, but at least it all co-ordinates
nicely.  😲😏)

"Half spent"...

Sunday, September 15, 2019

SHIMMER PENS #1

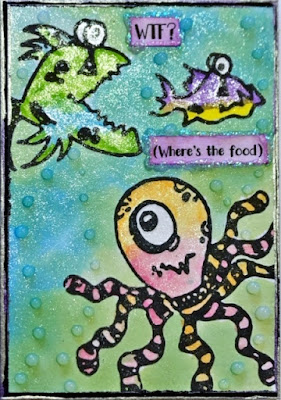
I recently bought some of the Nuvo Glitter Markers and loved the amount of shimmer in them.  I also have some Spectrum Noir and Wink of Stella shimmer pens.  Previously, I had only used them for adding colour to stamped or die-cut images but by scribbling some out onto a piece of acetate and then using a water brush to pick some up, you can create wonderful watercolour looking backgrounds that shimmer amazingly.  This technique needs to be tried out as the computer/phone screens just don't do these atc's justice in the shimmer department.  You can see a little better how much shimmer you can get in the one called "WTF" as I happened to catch it in just the right light.  If you do this technique and there's not enough shimmer, you can use your clear shimmer pen over the top of the coloured areas to add even more clear shimmer as it won't affect your colours underneath.  Try it... you'll like it.  😎

"Moon"...
(The shadow behind the bat over the moon is
created by raising the bats up with foam tape)

"Smile"...
(The skull is one of the pieces I made using
last fortnight's technique of Stucco Gesso)

"Different path"...
(The shadowing behind the bird is created by 
raising the bird up on foam tape)

"Deeply Creepy"...
(Both the moon and the ghosts were added after
by stamping the shapes with Versamark, then brushing
Perfect Pearls in Pearl over them)

WTF?

This last one is from the Embossed Gloss Stamping class a couple of fortnight's ago, but this one has no stamping in the background.  I just did the water/powders/embossing steps straight onto the gloss
card.  I really wanted to use the die-cut shapes I had bought and these colours worked perfectly.

"Wish"...

Tuesday, September 3, 2019

STUCCO GESSO

 Gesso is a great way of adding texture to your backgrounds or even your die-cut or chipboard shapes.  I have used both black and white gesso on these samples below.  If you're using white gesso on plain white card stock, then once it has dried, you can colour with a quick swipe of Distress Oxide Ink Pads, then spritz with a little water to get the colour to run (& blend if you have added a couple of colours).  The trick to getting lots of texture is to apply the gesso randomly and not too thick all over, you want varying depths of the gesso.  Then hit it with the heat gun to dry it.  It will cause it to dry much quicker but will also give the added bonus of bubbles which, when dried, will flatten down a little but will still be very textured.  I have also used black gesso on black card, then instead of Distress Oxides, I have simply gently swiped over my clear embossing ink pad to just get the high points of the texture, then dump on embossing powder and heat.  This is how I've created the crow in "Terrors" below as well as the bird on "Scenic Route", but on that one, I used white gesso on chipboard.  Have a play.  😊

"Terrors"...

"Scenic Route"...

"Nocturnal haunting"...

"Made in China"...

"Vogue"...

"Glorious Mess"...