Showing posts with label crackle paint. Show all posts

Friday, October 9, 2009

More Crackle Paint & some Glass Bead Gel!

Continuing from the last post, here are more of the crackle atc's.

"Breathe"... Picket Fence (white) crackle paint with some Weathered Wood Distress Ink rubbed onto it to drop the starkness of the white back a bit. If you enlarge this picture by clicking on it, you'll see I also used Golden Glass Bead Gel over the image. This goes on opaque but when the medium dries, all you can see are the little spheres of glass and it also gives it a wonderfully textural feel! Love it!!!


"Transformation"... The fabulous H.R. Giger images will always work well with Black Soot Distress Crackle!


"Portal"... Scattered Straw Distress Crackle, rubbed with some Peeled Paint Distress Ink and Vintage Photo Distress Ink after the crackle had dried. The little brick stamp in the top right is by Cherry Pie.


"Reliquary"... Gothic silver embossed script in background is from Michelle Ward's Printed Matter rubber plate and the beautiful silver window is from Scraptivate - it's one of the many, MANY, styles of German Scrap that we sell at the store. These window arches also come in black and white. I love the silver as you can wipe paint over it and then wipe it off and it grunges it up nicely! The image has the Helmar Crackle 2 step used on it with Payne's Grey paint added and wiped off after the crackle had dried.


Next up is Dominoes! So over the next few days I'll be slaving away in my studio with these little cream plastic toys, trying to come up with interesting looking atc's! We'll see.....

Saturday, October 3, 2009

Crackle Technique & a Canvas

Several years ago I posted about a "poppet" style canvas (a la Claudine Hellmuth style) I had made for a friend's daughter who had lost her Dad to cancer when she was only 4. Her baby sister was born only a couple of weeks after Steve died so she has no memories of her Dad. Little Ava is now 5 so it's time that she had her own canvas with her Dad and her in it. Aisha, her big sister is probably going to be more excited about this when she sees it as it's the same picture of her Dad that I used in her canvas. Here's a link to the previous one for Aisha. These are both 8" x 10" canvases. Not my usual dark & gloomy style but I'm a Gemini and I can chop and change at whim. ;-)


This fortnight's round of classes at Scraptivate is Crackle Technique. We sell several types of crackle including the brand new Rock Candy Distress Crackle. This first atc is the Helmar Crackle which is a 2 step crackle...a base coat, let dry for 20 minutes, then the top coat. As you can see it's a clear crackle so over pictures it's great as you can add some paint when it's dry and wipe it off and the paint settles in the cracks.

"Fragment"...

"Betroth"...this is also using the Helmar Crackle.


Ranger also make the Distress Crackle in 24 colours + some metallic colours.
"Rock and Roll"... (Black Soot Distress Crackle. Yep, yummy Ville Valo, lead singer for HIM....my favourite band!)

"Live it"...also using Distress Crackle in Old Paper colour.

"Angel's Art"... Milled Lavender Distress Crackle.

"Temptation"... Aged Mahogany Distress Crackle.


"Icon"...this is the new Rock Candy Crackle from Ranger. I've put some red paint over the top part of it and used Fired Brick Distress Ink rubbed onto the bottom part. You can see the difference that the paint makes...much more seeps into the cracks. Probably would've been better with a less detailed picture underneath. Live and learn.


"The first rule"... This is the Ranger Crackle Accents. It comes in a bottle like Glossy Accents or Dimensional Magic and goes on the same way... through a small tip that you just squeeze on and spread it around. Very easy!


Guess I'll have some more when I do some samples for the classes over the next week.

Saturday, January 17, 2009

A free give-away (blog candy), more Texture Paste Covers & atc's, canvases

Texture Paste class at Scraptivate is over, I've completed 4 of the covers in the classes as well as made numerous atc's using various ways of applying texture paste. Because I do a sample of the ATC Technique Book Cover in each class, then also paint the previous dried sample, I've ended up with 4 of the Texture Paste Covers for the book. They are 6" x 8" in size and I've decided that I don't need them all so I'm going to give 2 of the new ones away.....your choice! You can use it as a cover for a book yourself or whatever you want, cut it up, wipe your feet on it, whatever! lol
All you need to do is leave a comment and I'll wait about a week before doing a random pick from the comments for the winners. Here are the new covers, (all paint by Golden Paints). Please remember to leave your email address if it's not on your blog and also remember to check back to see if you've won!

#1... (colours used are Quinacridone Nickel Azo Gold, Dioxazine Purple, Interference Oxide Green)

a close-up...

#2...(colours used are Turquois Phthalo, Quinacridone Magenta, Iridescent Silver)

a close-up...

#3...(colours used are Phthalo Green (blue shade), Turquois Phthalo, Iridescent Gold)

no close-up...

Remember, all you need to do is to leave a comment below this post to have your very own miniature door-mat!!!....I mean "book cover"!!! (if you can't poke fun at yourself, how are you supposed to enjoy it when others do it!)

I also did some more atc's as samples and raffles for the classes. The effect of Glimmer Mist sprayed on dry texture paste is gorgeous, especially when the texture past doesn't cover the whole card as the card absorbs the mist differently than the non-texture pasted areas. Here are a couple of retro ones using the Glimmer Mists.
"Laser printer"... (Glimmer mist colour is Frost)


"Wisdom"... (Glimmer mist colour is Tigerlily)

"Portrait"...(using cuttlebug waste for texture paste scroll up the top)


Yesterday I had a catch-up with some of my arty friends, these are the girls who meet up (or try to!) once a month for a few entertaining hours of laughter, gossip, support and sometimes even art! We have made a committment to do better in the "art" department this year...starting with a shadow-box canvas. Anyway, for a Christmas gift swap this year we did 4"x4" mini canvases to swap. Here is the one I did that Lyn received. (I'll put up the one I received in my next post - can't find the camera.)
"Traveller"...

Lastly, here is an uncompleted 4"x4" canvas where I've used the Golden Crackle Paste over part of the canvas and just had a paint play with some greens and paynes gray. Not sure what to do with the rest of it but it'll come to me eventually. For now I'm happy just to look at the texture.


Wednesday, August 6, 2008

Assorted work - canvas, card, atc's & how to track your blogs!

At the end of this month (August) I'm going to be teaching an inchie class using a 4" x 4" canvas as a base. As inchies are notoriously small I've decided to cheat a bit and make mine 1-1/4" in size so I can fit 9 of them onto the 4 x 4 canvas. We have an absolutely wonderful example of a MEGA-INCHIE canvas in at the store (Scraptivate) that just shows how fabulous a whole lot of little inchies can look when all grouped together. It was put together by Audrey after both she and I had participated in an inchie exchange with another online group. I have yet to do anything with mine as I'm a little over-awed at how Audrey's has turned out, a hard act to follow! I'll take my camera to work to get some pics and post them soon....promise!!!


In the meantime, here's some shots of my smaller canvas. If you're in Perth and want to learn how to make one of these using all sorts of techniques, give us a call at the shop (9444 6626) to book in!


The whole thing with all 9 of the inchies...


These next 2 are raffle atc's for a couple of previous classes that I forgot to post earlier. First is "Regal" for the Textured Backgrounds class - Svetlana "won" this one.....hahaha....sorry, private joke. ;-)

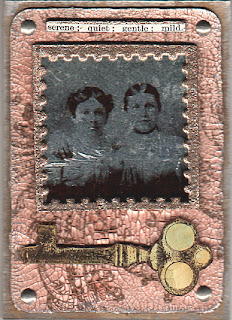
"Serene" was won by Mel at the Faux Tin Type class last week, yay Mel....she pulled her own raffle ticket out! No, not rigged at all, just a lucky pick! That's our story and we're sticking to it, right Mel??? I've used the Ranger Crackle Paint in Tattered Rose on the background of this one.

I've been lucky enough to be the recipient of several on-line awards recently, so I'm going to list them all here together. It's very, VERY hard to narrow down single blogs for awards so I nominate everyone who's listed in my favourite blog lists to the right. I learn something from virtually every blog that I visit and I think that it's important to remember to share, share, share what we learn. Kind of a "pay it forward" type thing with our collected art knowledge travelling the globe and infecting (in a good way!) other unsuspecting blog surfers who stumble across our sites with the love of art in all it's glorious forms! Man, what a long sentence!

So a HUGE thankyou to the following talented people for bestowing these awards...

Thankyou Audrey and Jenny (Crozza) for the Brilliante Weblog Award...


Thankyou Nancy for the Kind Heart Award...


and Sam for the BFF Gold Card Award...


On another note, I've had several conversations with friends about the unfortunately demise of Blogarithm, a neat little program that helped you keep track of all your favourite blogs and sent you a daily email when they updated. Alas, it is no more. Darn it when they try to fix something that isn't broken and then it's REALLY broken for good!!!

So now I use bloglines. You simply input your favourite blogs, then you can keep track of who's updating easily on one page. The easiest way I've found to do this is by adding your bloglines page (after subscribing, so it links to YOUR bloglines page) to your links (in favourites), then when it opens up it has a list of your blogs you've subscribed to and if they are in BOLD, then that blog has been updated. Click on the blog and it'll open up on the right hand side of the screen and if you want to leave a comment, simply open the blog by clicking on it from this right hand side. I've also added a "sub with bloglines" link to my links bar so if I happen to come across a blog I really like, within a couple of clicks I've added it to my bloglines list. Easy! It's actually easier to DO than to WRITE. Confused? Questions? Ask me and I'll try to be a little clearer.

Onto more pictures...my cousin Corey and his wife Kellie are expecting their first child. I attended Kellie's baby shower last weekend and I made a card for her. As you know, I'm not really a card maker at all, I tend to just try to think of them as BIG atc's. I used a picture of an unborn child and printed it on transparency, xyroned (that must be a word!) it, also printed the quote on transparency and gave that the same xyron treatment and attached them both to some nice pale green paper. I also used a couple of cuttlebug chipboard corner embellishments which I painted using the new in at our store Twinkling H2O's Radiant Rains in a dauber. The colour was Olive Gold (I think? it's the only olive green one), beautiful olive with a sheen of gold shimmer just like the fabulous Twinkling H2O watercolours but much easier....dab, dab, dab. Here's the front and then the inside with the quote.


The West Wing is about to start....bye....

Thursday, March 13, 2008

Crackle Technique, Canvas class & The Trip

Last weekend I had another one of my canvas classes. I taught different canvases, all basically using the same technique but the girls had a choice of several different styles. They were all surprised at how quickly it comes together, the class is 2-1/2 hours but after you've done a few of them you should be able to get that down to around 1 to 1-1/2 hours. The hardest thing is to make your decisions about images, colours, quotes, embellishments....isn't that always the way though!
Here are a few of the canvases that some of the girls made, yes, I remembered my camera this time! First up are Debra & Lorraine...

then Karen & Donna...

....then Jane M & Jane W...

....Sheryl & Marie....

lastly Nicky & Caryl...

There were another 6 girls in the class but I didn't manage to get photo's of them all, but at least you can see the different styles represented here.

After the canvas class was an atc class on crackle techniques. We used Ranger Crackle Paint for backgrounds, Ranger Crackle Accents on images and also a 2 step crackle using Helmar 2 step crackle which will create a cracked effect over an image. Below are some atc samples using the 3 different techniques, some of them you may have seen before in earlier posts.
The Ranger Crackle Paint works best for me on chipboard rather than paper-weight and what you would consider is a thick coat is actually a medium coat. Generally if people can't get this stuff to work, it's because they've laid it on too thin. Just slap it down, it is self-levelling and let it dry. Once it has started to crack you can use a hair-dryer to force dry the rest of it. The act class is 2 hours and these backgrounds were all dried and made into atc's in that time period. Here's the raffle atc for this class using the Ranger Crackle Paint. (Weathered Wood colour)


and another... (antique linen colour)

Crackle Accents is applied just like a dimensional medium (Glossy Accents, Dimensional Magic etc) over an image, let dry - this takes hours - and your image has a crackle finish to it. This stuff doesn't work on non-porous surfaces though, only paper/cardboard type substrates. This is a sample of Crackle Accents - the man is crackled.


The Helmar 2 step crackle is a little more complicated. Once you have painted Step 1 onto your image, not too thick a coat, just a normal sort of coat, you have to let it dry to the tacky stage. On the jar it recommends 10 to 20 minutes though it depends on your climate and how thick or thin you have applied it. You have to wait for all the creaminess to go away and your image to become clear before you can go onto the next step.

There are a couple of main points to remember with the second coat of the Helmar 2 step.
You must make sure that you totally cover all of your step 1 coat, if you leave any edges uncoated then these will stay tacky as the base coat dries to a tacky finish and stays tacky! I did Step 1 in the class to show the thickness and took it home. The next morning I applied the 2nd coat and it worked perfectly fine so the 10 to 20 minute rule is just to make sure that you don't try to apply step 2 too early!
Secondly, don't go back over where you've already painted with the 2nd coat. I start at the top of the image and using a soft brush, start to paint the 2nd coat on, going down the image and across. Very hard to explain, but I'll try. I start at the left top of the image and go across the image to the right side and then move down a bit and go across back to the left. Making sure that you've not left any bits uncoated. I use a sort of cross-hatch motion as well. This needs to be a trial and error thing but once you've done it a couple of times and it has cracked, then you'll know how much to use and the direction of your 2nd coat can affect which way the cracks appear.
After the second coat has dried (it needs a fair bit of time - can be force dried with a hairdryer to finish the cracking off - just don't overheat the paint), you can apply some acrylic paint in a contrasting colour and wipe it off immediately so you don't let it dry on the image. When you wipe it off you should have some of the acrylic colour seep into the cracks to highlight them. You may need to use a baby wipe very lightly to wipe off the extra colour from the image, just don't over wipe as you'll soften the crackle.
After all of this, if you find that you've got some tacky bits as you haven't done the edges too well, then I use a bit of Treasure Gold in a colour that's relevant (silver, copper, gold etc) and rub it onto the edges of the image lightly. This will cover the tackiness and solve the problem.
These are some samples of this Helmar 2 step crackle technique.


I don't do much personal info on my blog but you may have noticed my ticker counter on the right hand side counting down to a holiday! Only 4 weeks to go now before we go on 2 back-to-back cruises. Firstly a 15 day cruise to Columbia, the Panama Canal, Costa Rica, 3 stops in Mexico and finishing at San Francisco. Then later that same day after arriving in San Francisco, we leave on the same ship for a 15 day trip up to Alaska visiting Astoria, Seattle, Ketchikan, Juneau, Hubbard Glacier, Skagway, Sitka, Inside Passage, Vancouver, Victoria and then back to San Francisco!

Going on this wonderful trip of a lifetime is my hubby and myself, my Auntie and Uncle (who are only about 5 years older than us) and my Mum and Dad. Well, that was the plan anyway....we've had some bad news from Dad's doctor and he's unable to make the 13 hour plane flight from Sydney to San Francisco. Too tough on his heart and lungs, he has asbestosis from working in Wittenoom and has some heart disease as well. So he is staying home, BUT showing what a truly wonderful man he is, he's asked my best friend if she would like to go in his place!!!! All the trip is paid for her, including her air-fares, all she needs is some spending money.

So this all happened within the last few days and now she only has to wait 4 weeks to go on a fabulous once in a lifetime trip! Joan and I have been best friends since we were 12 and she has had her fair share of personal tragedies in her lifetime and has come through with such a wonderfully positive attitude. Dad is really, REALLY, happy to be giving her this gift and I for one am really thankful to have a great Dad.....Mum's pretty cool too!!! lol She's sharing her cabin with Joan and she is virtually like a second daughter to my parents. We'll be sad to not be sharing the memories with Dad, but if it gives him some more time with us, then yay to that!

Friday, November 2, 2007

More shrink plastic atc's & Tim's crackle paint!

Below are more of my shrink plastic atc's....


First up is the raffle one for the girls tomorrow at the atc class - canvas paper background (rinse-aid resist), plus one of Julie van Oosten's new houses (available here) - this I've coated with Ranger Spiced Marmalade Distress Ink then the Rust Antiquities embossing powder....gorgeous rusty colour and quite matte too...not shiny at all! The shrink plastic is white, coloured with alcohol inks (less is definitely more!) and then stamped with Timber Brown Stazon.
The reason I said earlier about going easy on the alcohol inks on shrink plastic is shown below! This atc is another ERROR ALERT!!! ERROR ALERT!!! If you use too much alcohol ink then the piece of shrink plastic is really, really, REALLY, dark when it shrinks down. I loved the colours in this piece with the words on it though, so I decided to cut a little window in the back of the mat board. So if you are looking at the atc in the palm of your hand you can see it fine, it just looks quite muted. But when you hold it up to the light...oh my!!!! Stained glass effects galore!!! I used the ruff'n'ready (pre-sanded) shrink plastic for this top piece with the word stamp and alcohol inked the back of it, then stamped in Timber Brown Stazon on the front. The bottom picture is another ink-jet printed image on shrink plastic. Yep, did a whole page of images!


Okay, we just got the new Ranger Crackle Paint in at Scraptivate and I decided to try out the Antique Linen on some chipboard. Can you say G O R G E O U S or what!!! I'm definitely going to be trying out the other colours, so simple to use, slap it on, walk away and come back amazed! I used Walnut Stain Distress Ink to further enhance the cracks. This piece also has an ink-jet printed shrink plastic picture (surprised???). We also have just got in store the Ranger Stickles, these have been around for a while and I've had Diamond (which I love) but I bought the Platinum and smeared it over the shrunk picture before doing a coat of Dimensional Magic. Turned out quite nicely. I'm happy with it anyway. A little more "glitzy" than I usually do but I AM a Gemini so I'm allowed to be change-able.


So the door bell rings at 8am this morning, a parcel is waiting. OH MY GOD!!!! The fabulous Belinda Schneider sent me some awesome stuff!!! A magazine with the very delectable Ville Valo (lead singer of HIM) on the cover - article inside. A whole book of that wonderful Germanic Script that I sooooo love (now I can stop photocopying the 6 pages I have!!! lol). Also, ta-da!!!!! I now OWN one of Belinda's amazing Gothic Icicle Dolls with the very cool bat stitched to her back.....I coveted these as soon as I saw them here.....might sleep with it tonight! Also included was a gift wrapping sheet with more script and Gothic-type pictures. Talk about spoilt!


Thank you Belinda....you're a......DOLL! ~groan~

Sunday, September 2, 2007

Retro canvas, crackle & Spotlight atc's

I made another canvas today in a retro style, a girl at work (Scraptivate) commented that she liked retro.....I do too - I've done quite a few retro atc's in the past as well as some retro canvases before. This one incorporated some new sequin waste that I had ordered which just arrived from the US, there was some with smaller holes than is available here as well as some with HUGE holes! Sequin waste works great with texture paste....this is what is up on the top left corner of this canvas. I also used the peeled paint technique as well. Poor girl ended up with a big blob of yellow ochre paint over her left eye, which is why she has this other eye over the top....all in the vein of "no such thing as a mistake"!


Also made today was a couple more Spotlight Technique atc's for the up-coming atc class next Saturday...one of these will become the raffle atc.

This one is made with an alcohol ink background on gloss card, the second stamped images are on plain white gloss card which have then been slightly coloured with Tombow markers. You can't really see this very well on the computer screen, the colouring is very subtle but can be seen better irl (in real life).

Next one is on plain copy paper, smoosh technique using Rangers Distress ink in Mustard Seed and Pine Needles. Second image is on plain white cardstock, colouring was done using the Ranger Cut 'n dry nibs on the Distress Ink Pads in various colours - Tattered Rose, Pine Needles, Broken China and Worn Lipstick. As well as the inimitable German Scrap coloured with Treasure Gold!

Coming up soon in my atc classes is a crackle class. There are several products out there that will do a crackle effect, not always exactly how you want them to though! This next atc I have used the Helmar 2 step crackle on the angel and after it was dry & cracked, I rubbed some Quinacridone Crimson (Golden) over the top to define the cracks...love crackle!!! Will be interesting to see how Tim Holtz's new crackle paint turns out. I believe this is a 1 step crackle with is always a bonus PLUS it's going to come in all the fabulous distress colours. Think I might put off the crackle class until this stuff arrives in our store!


Comments are always welcome, even if it's to say "you talk too much!" hahahaha