Showing posts with label Soot technique. Show all posts

Friday, September 7, 2018

EMBOSSED SOOT

Soot technique has always been a favourite of mine, such a simple thing as gloss card stock, a candle and a clean stamp, some fixing spray and you have the makings of a wonderful atc or card.  To change things up a bit, we'll be embossing an image with clear embossing powder first, then maybe add a little colour (sponge on Distress Oxides), then add the soot.  At this point, you can't touch any of it as you'll just leave fingerprints so you carefully wipe away some of the soot where you want to reveal either the white (now light grey) card underneath or some of your colour you sponged on.  When you're happy with how it looks, spray with fixative and let it dry, then it's all done.  Simple but very effective.  Add your chosen embellishments to go along with your stamps and it's a quick and easy technique.

"Saltwater"...

"Find your wings"...

"Black"...

"Brightest Star"...

"Darkness"...


Finally, this is one from the last class where we used foil on top of mostly dry alcohol ink.  For that class, we used Yupo with the alcohol and foil but below is a sample that I made using black gloss card, then the alcohol inks, then the foil.  It has an amazing depth that the computer just can't capture.  I used a fine Zig pen to lightly outline the die-cut shapes, then when tacky (about 1 minute), pressed some silver foil on to them.  It really makes the shapes stand out from the background!

"Eternal"...

Monday, June 15, 2015

SPRAYED REVERSE SOOT

Soot technique has always been one of my favourites, it never fails to impress people who have never seen it done before.  When I originally did the soot technique in my classes years ago, we did it on plain white gloss card, then when some of the newer girls wanted to repeat the class, as usual I had to try and put a spin on the original so the girls who had done it before, learnt something new.  Well, it's time to re-visit soot again and once again, there's a spin on it!  This time it's called Sprayed Reverse Soot.  For the girls who haven't done soot at all before, I'll be showing them how to do the original way and then this new way which is the reverse soot using a Versamark Ink Pad (clear embossing ink pad) to stamp your image first onto a coloured (sprayed) background, then applying the soot and wiping gently off with a cotton wool ball.  The Versamark holds the soot onto the stamped image!
 
"Joy"... (reverse soot stamping - Broken China spray
and Cracked Pistachio)

"Extremes"... (reverse soot stamping - Pumice Stone
spray & Iced Spruce)
 
"Kinky"... (original way of doing soot stamping)
 
"Wild Life"... (reverse soot stamping onto
plain white card)
 
"Without the dark"... (original soot stamping on sprayed
background using Fired Brick and Fossilised Amber)
 
"Salvage"... (original soot stamping on sprayed
background using Broken China and Cracked Pistachio)


Finally, here is the last of the Bokeh Technique atc's.
 
"Live Well"...

Friday, September 3, 2010

Art Doll Class & Soot technique

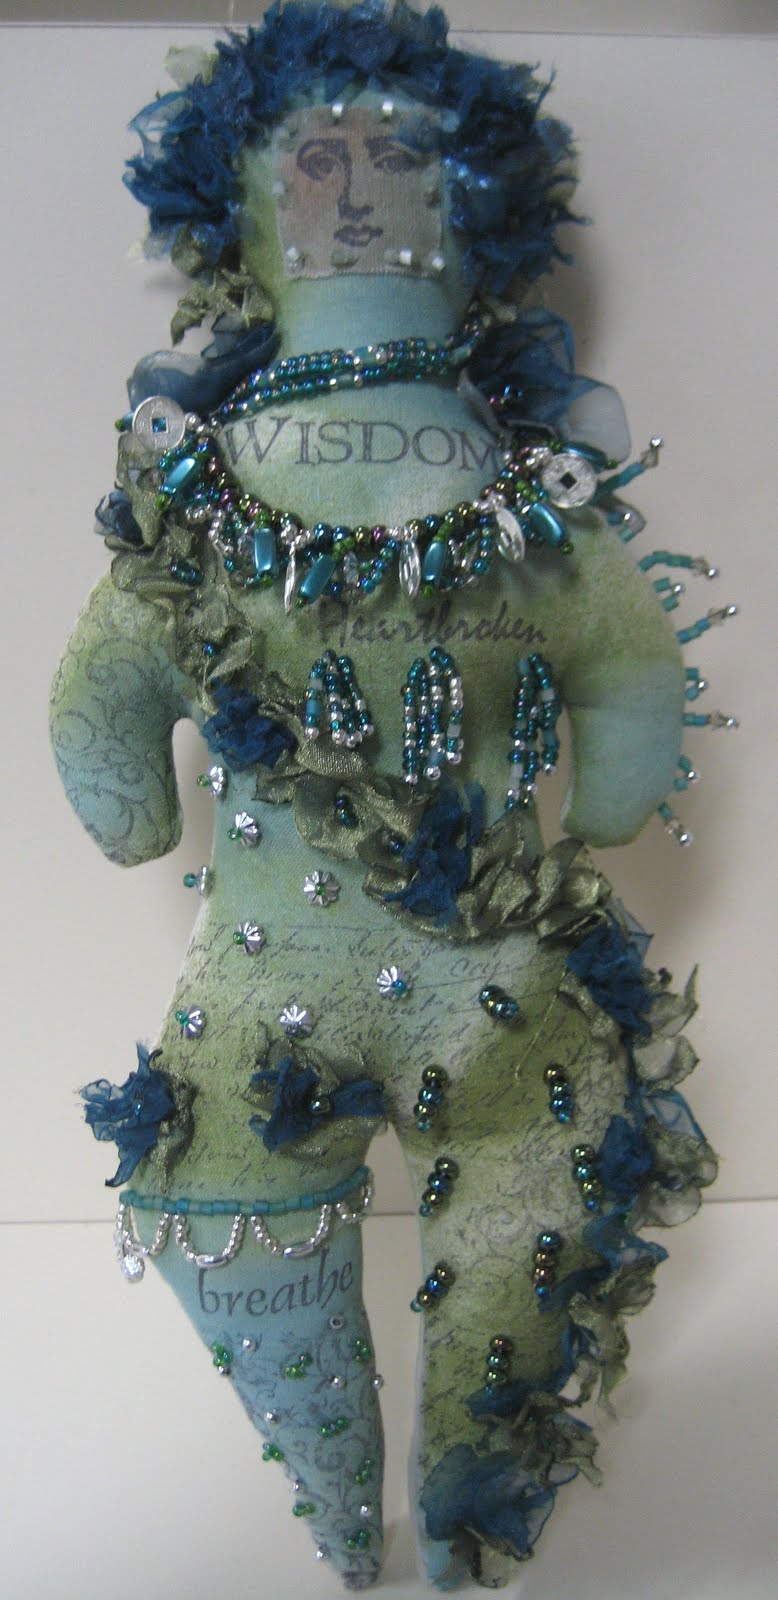
Yay, I'm back online and it sure makes you realise how much you rely on the internet to keep you in touch with everyone! So I now have my art doll finished and the pics are ready to be shown......
I'm teaching this art doll at Scraptivate and I'll probably be repeating this class another couple of times - once during the day over 3 sessions and another weekend series of classes. This doll is made over 3 classes of 2-1/2 hours each. The girls will be doing everything from scratch, from tracing the pattern to freezer paper, ironing it to the fabric, stitching the body, turning, stamping, colouring then stuffing - all this on the first day! The 2nd class is beading and the third class is all about the organza decoration.


This is the back view of the "hair"...


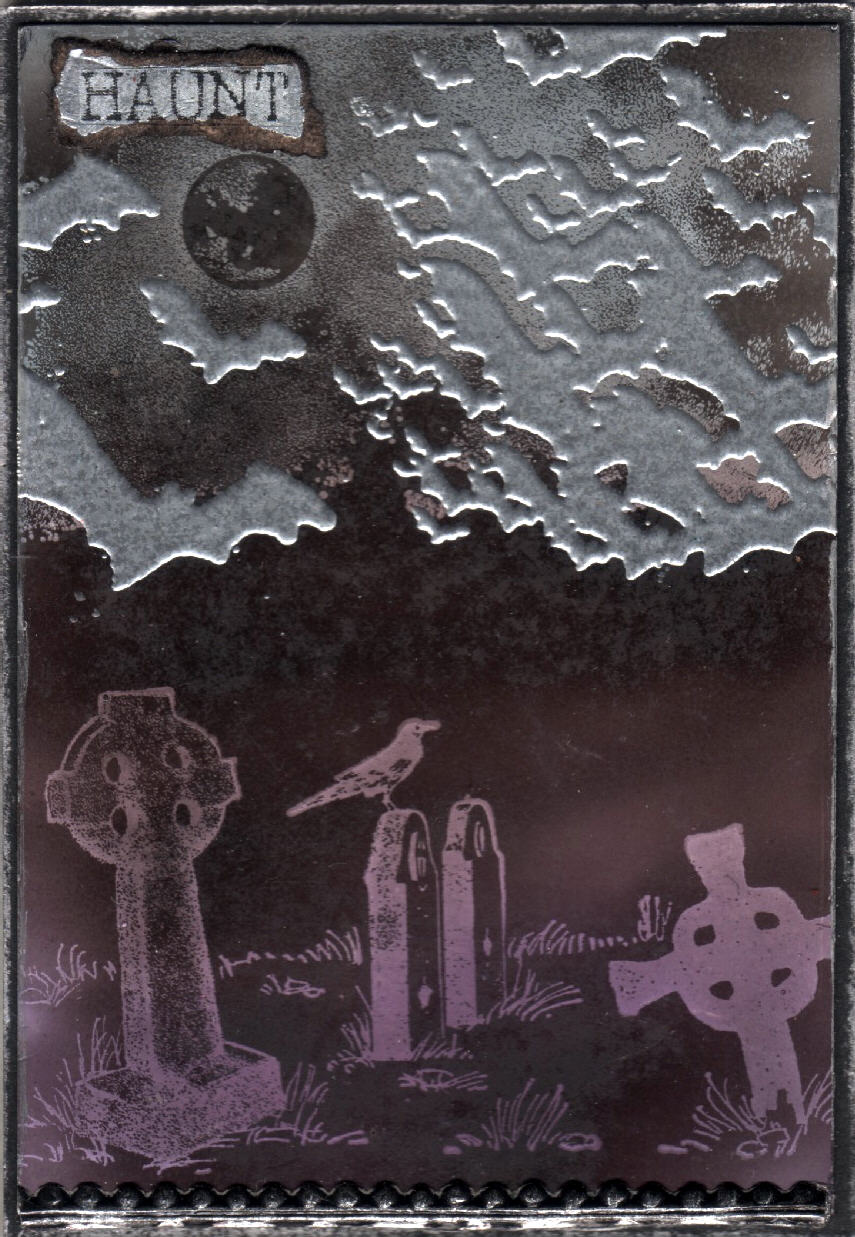
I'm also teaching the soot technique again tomorrow morning at the ATC Technique Book class. Another of those old techniques that have been around forever but is just simply spectacular and oh so simple!

"Haunt"...


"Gaze"...

"Blossom"...

"Fragile"...
Hope the girls bring a good dose of patience with them for the art doll class tomorrow as well as their sense of humour....which I shouldn't worry about as we usually have a pretty fine time with lots of frivolity and a little naughty humour. ;-)

Friday, August 20, 2010

Shrink Plastic Revisited & Faux Wax & a cake!!!

Addition.....scroll right down the bottom for a 5 minute microwave cake recipe.....

I'm revisiting Shrink Plastic for my class tomorrow. I have had a bit more of a play with it since I last taught this class back in early 2009 because I like to do something fresh for the girls who've done previous classes with me. It's also nice to introduce the newer girls who've not been amazed by some of the older products and techniques that have been around for a while.


For this first one I've combined 2 different new techniques that I haven't shown before....I coloured a piece of white shrink with one of the Tattered Angels Glimmer Chalks - of course it won't dry as shrink is a plastic surface but by the time you've heated it, all is good and it dries wonderfully. The second thing I did with this particular piece was no stamping beforehand, just spray with the glimmer chalk, shrink it down and then while it's still hot and soft, stamp into it with a stamp with black stazon. Gives a wonderful textural element as well as a soft matte finish.


"Post-script"...


"Enter"... (this is a terrible scan, it's because there's the shrink plastic door on top of foil tape on chipboard, on top of flyscreen, on top of the background....too much height for the scanner to cope with, sorry)


"Vision"...

"Doors"... (the stamped words are Stazon silver metallic ink on black shrink - you can actually read the wording irl but because of the silver ink, it's throwing the scan off)


...

....

.....

......

.......

WARNING!!!! Naked male backside coming up.....if you don't want to look, scroll and close your eyes....
...
....
.....

"Work in progress"...


Below are the last few Faux Wax atc's from the last class.

"Kiss"... (the background of this one is from the Metallic Cardstock class, technique described in the previous posting)


"Dance"... (the gold sparkles on the background is Jo Sonja Gold Dust. I've described this product before but this is the first photo where you can actually see it!)

"Bloom"...


Dreams"... (this background is from the upcoming Soot class)


"Weird Desire"... (another soot background)


I've also been working on my fabric art doll. This will run over 3 classes of 2-1/2 hours each at Scraptivate and the girls will be making it from scratch - from tracing the pattern, stitching (on a machine) around the body, turning, stamping, colouring, stuffing, beading and embellishing. It will certainly be an exercise in patience for them. The head alone has about 90 small burnt organza flowers on it....yes, FLOWERS (though they are shabby ones). I'm about half done with the embellishing and when it's complete I'll post pictures. The class is in 2 weeks time (4th September is the first class) and I may run it a second time if the numbers warrant it. This is certainly something out of the norm for most of these girls and I hope they enjoy it as much as I think they will.
I may even have one of these for a give-away on my blog....all things going to plan!
5 MINUTE CHOCOLATE MUG CAKE
4 tablespoons S R flour
4 tablespoons sugar
2 tablespoons cocoa
1 egg
3 tablespoons milk
3 tablespoons oil
3 tablespoons chocolate chips (optional)
A small splash of vanilla extract
1 large coffee mug (MicroSafe)
Add dry ingredients to mug, and mix well. Add the egg and mix thoroughly. Pour in the milk and oil and mix well. Add the chocolate chips (if using) and vanilla extract, and mix again. Put your mug in the microwave and cook for 3 minutes at 1000 watts. The cake will rise over the top of the mug, but don't be alarmed! Allow to cool a little, and tip out onto a plate if desired. EAT ! (this can serve 2 if you want to feel slightly more virtuous).

Wednesday, August 5, 2009

Beeswax atc's

Beeswax is the technique for this fortnight's classes. I prefer the natural beeswax with it's warm honey colour and beautiful smell. You can also get bleached beeswax but you can't go past the natural stuff, my personal preference anyway. I like to add extra colour with children's wax crayons, as can be seen in the following atc's.

My homage to organ donation...
"Salvage"... (The salvage word was added by stamping the word onto white tissue paper with red Stazon, then melting it on with extra beeswax at the end. A perfect way to add wording that really blends in.)


This next one was a vintage McCalls dress pattern picture which I then added a piece of dressmaking tissue over the top giving it a vintage colour. Blue crayon was added to pick up the colour of the main dress. I also put some blue seed beads in extra wax down the bottom and rubbed the edges of the card and over the seed beads with Treasure Gold (a metallic wax like Rub'n'buff).
"Flair"...

This is an image added over the top of scrapbook paper, extra crayon for colour and a chipboard circle to highlight her face.
"My nose itched"...

As I didn't add a word to this one it's simply "Untitled"...


I have some more beeswax atc's to do as there's not enough here for samples as well as raffle atc's to give away at my classes.
This one below is my last Soot one from the previous technique. Loved this stamp from the Cherry Pie plate that I got for my birthday from good friends. ;-)
"Life is an Island"...


At Scraptivate this past weekend we've had 3 wonderful classes taught by the uber-talented Jenny Crossley. The girls made an altered "Swallow" book on Saturday, then on Sunday and Monday there was 2 separate classes where a metal etched booklet necklace was made. Photo's of these classes will be coming up in a future post. It was great to have Jen staying with me, a wonderful guest and an awesome teacher and friend. I could make some comments about something she took to bed each night...but I won't, I could also say something about Dawnie's gift to her and what she was doing with it...but I won't. Your secrets are safe with me Jen.....just deposit $1000 into my bank account, I'll send the details! hahahahaha

Saturday, July 25, 2009

Soot Technique ATC's

Soot technique is an old favourite of many stampers. It's quick, simple but gives spectacular results. The original technique simply used white gloss card stock but I wondered how they'd look with some colour put onto the gloss card first so I have coloured some of the gloss card with alcohol inks or glimmer mists. How to make a great technique even more wonderful.....add some colour first!
All of the following atc's have colour added to them. To find more on soot (including non-colour ones) on my blog, simply type in "soot" in the search box on the right. Handy little widget that one!!!

These first 2 are the samples in my atc technique book that the girls in my classes are making. Of course, they are doing their own style to put into their books.

"Black Bird Fly"... (stamps by Cherry Pie and yes, that's a bit of flyscreen down the bottom!)


"Fragile"... (Tim Holtz tree stamp, Green Pepper Press fragile stamp. Fragile stamp embossed with Ranger Queen's Gold embossing powder, a beautiful colour.)


Samples for the classes:
"Damaged"... (Zetti face stamp, circle stamps by ??? - an old cheapie I've had for years!)


"Line"... (Green Pepper Press building stamp)


"Fear Not"... (Zetti main stamp, splotch by ??? and Fear Not by Cherry Pie. Love the colour of the embossing powder too, it's Liquid Platinum by Ranger!)


"Odonata"... (Dragonfly stamp by Stampers Anonymous with some Antique Linen Distress Stickles down the left and Golden brand Bronze paint splattered over the surface)


I recently took part in a yahoo group atc swap using Twinkling H2O's so I made some bleach & H2O atc's and posted them off. As I had made one extra, I included this in a monthly WTA (Winner Takes All) on another yahoo group. This is about the most trading/swapping I've done for ages! The stamp is a discontinued Hero Arts Vintage Map stamp, pity they don't make this any more....I could've sold heaps of them!!!

"Traverse"...


I do have more soot ones in various stages of production in my studio and will post them when they are done.

Sunday, March 30, 2008

Shrink Plastic atc class, soot class

The shrink plastic atc class that I taught a couple of months back was so popular I decided to do a "shrink plastic re-visited" class as there are other techniques that can be done with this product. Here's the raffle atc from the last Saturday atc class...


The shrink plastic portion of this atc is in the upper left hand corner. It's a piece of white shrink plastic that I cut out using deckle decorative scissors, then lightly scribbled some coloured sharpie marker on it, then blended the colouring with the Blending Solution that is used for Ranger alcohol inks. Before heating it with a heat gun, I inked up a postage-mark stamp with brown Stazon and left that aside for the moment. Then the shrink plastic piece was heated with a heat gun to shrink, when it has shrunk to it's fullest, while it is still hot, I stamped into it with the postage-mark stamp and pressed down. I waited for about 5 seconds for it to cool then lifted up the stamp and the shrink plastic piece comes off the stamp cleanly, leaving an impression in the shrink plastic piece so it is much more textural than a normal piece of stamped shrink plastic. I then mounted it onto a piece of torn dark brown shimmer paper and attached to the atc.

Another way of using shrink plastic is to do multiple stampings on a piece of shrink plastic of a reasonable size - say 6" x 5". Stamp like you would for a collage piece, the piece can be coloured first with sharpies or alcohol inks or you can sand first (if you're using white or almond), then stamp, then colour the images if you like. You can then cut sections out using decorative scissors (or normal scissors) or use a large punch so you get portions of different stamps on each piece, then shrink and use how you want!


I taught another soot class on Tuesday night last week and the girls all loved how they turned out using Glimmer Mists underneath the soot for added colour & shimmer. I have used alcohol inks before under the soot before, but the Glimmer Mists are so fabulous as there's a huge colour range - from blues, greens, reds, yellows as well as metallic silvers, bronzes and golds. I didn't take a picture of the raffle atc before I gave it away but the base colour in Glimmer Mist for the raffle one was called Patina....a beautiful blue shimmery colour. This one below is another sample I did for the class using the colour Wheatfields, a lovely olive green colour with a green pearly shimmer.

The instructions for doing the soot technique is here.


This weekend I have also worked on a canvas though I can't show any pictures yet as it's supposed to be going into a scrapbooking magazine (stop laughing.....I CAN do things that may appeal to scrapbookers too!!! lol) When it's published I'll be able to post the pics as well as which magazine it is - I don't remember if it is Scrapbook Creations, Scrapbooking Memories or something similar sounding???


Less than 3 weeks to the big trip, biggest decisions are how many pair of shoes to take and whether to take day cream & night cream, or just wing it with one to cut down on weight!!! lol

Monday, March 3, 2008

Birdhouse, Cards & Scraptivate shop & 6 things

I hope you're all ready for lots of photo's in this post!


I thought I'd start off by showing you the wonderful store where I work and teach, Scraptivate here in Perth, Western Australia.

This is what greets you as you walk in the door, our display table, full of wonderful Collections samples, as well as some other bits & pieces.....mostly chipboard goodies that have been decorated to the hilt!

Here's the Collections products stand....as you can see, lots of lovely chipboard for altering...these are available online at Scraptivate and yes, we ship worldwide!!! If you've seen the lovely houses that Linda has had on her blog, they are part of the fabulous Collections range of products.....oooooh, don't I sound like an advertisement for Julie....she's a lovely girl (the designer of the Collections stuff and better still - a local!!!!).


Here's where we display all the upcoming classes.


Next is all the lovely German Scrap that we have for sale.

Anyone for a bit of patterned paper???


The tools and paint stand with a view into the classroom.


The ink/mists stand, rubber stamps are on the other side of this. This is not all of the shop, just a few of the stands, we have lots more!!!


We recently received some wooden birdhouses in the store for sale and we were asked if we wanted to take one home to decorate. I think there is about 6 of us who have them to alter and I've finished mine so thought I'd put the pics up.
The things that went into this are:

  • texture paste
  • gesso
  • Pearl White metallic paint
  • Dove Grey Stazon
  • Patina Glimmer Mists
  • Graphite Glimmer Mists
  • stamping on tissue paper
  • gauze
    shrink plastic (whoops, lost my bullet point on this one???)
  • metallic paper
  • antique pewter embossing powder
  • mica
  • brads
  • mouse cage wire
  • chipboard
  • sharpies & treasure gold
  • my clear words
  • a fuse
  • my own poem
  • and finally, clay wings.
Shrink Plastic Stampotique stamp...


The eye is stamped on mica...


The fuse and more shrink plastic (heart)...

The clay wings on the top of the house with my clear words, texture paste is on every 2nd square on the roof...


Front & left side view...

Front and right side view...

The fuse...with the backward "E". Sometimes you do things that you don't mean to do, but they turn out okay....I've had this "E" issue before!!! lol


A final close-up of the front panel...


So that's it for the birdhouse, now onto some cards that I have coming up in the March issue of Australian Stamping & Papercraft. I've had some atc's published 3 times before in this mag but I was asked to take part in a stampers challenge using a Stampers Anonymous stamp of a maple leaf with text. I know that Debbi is also doing this challenge so I can't wait for the issue to come out as Deb always does outstanding work! These are my 3 cards.


Spotlight technique using twinkling h2o's to colour sections of the leaf.


For this one I've alcohol inked the background gloss card, then done the soot technique on top.

Last one is shrink plastic tiles. I coloured the shrink plastic tiles first with alcohol inks, then stamped, then shrunk them.


So I'm not a card maker (can you tell??? lol), but I wanted to do something that incorporated some of the things that I teach in my atc classes. Now I can say I'm "published", not that it is a huge deal to me but for teaching purposes, every bit helps. ~grin~

Apologies if I've worn out your eyes with all these pics, also sorry if you're dealing with dial-up speed - been there, done that....what a pain! I know for some people, they have no choice....better slow speed than NO speed!

Finally, Sam tagged me to tell 6 non-important/quirky things about myself. I've done this before but it was 7 and I think I spilt my guts a little too much in that one....so here's some banal info about me...
1. I'm not a fake flower lover!
2. I used to tap-dance, do modern jazz as well as acrobats, AND I have the trophies to prove it!
3. I have 1 tattoo, got it when I was 15.
4. I love sharpies!
5. I have all my internal organs, except my gall bladder.
6. I am old, older than you think! (You are only young once, but you can stay immature indefinitely!)

I know I'm supposed to tag 6 people but I did this before so won't do it again....okay....now close your eyes.....sleeeeeeep.......sleeeeeeep.......sleeeeeeeep......