Monday, July 22, 2019

MAGIC ERASER & ALCOHOL INKS

I recently purchased some new alcohol inks from Riot Art here in Australia.  The brand is Paper Mill and all the samples shown below are made using these inks only.  Ranger is my normal alcohol ink go-to, but I wanted to try these ones out.  I have 20 colours (think that's all that is available) and they are very dense in colour and gorgeous!  Of course, you can use either blending solution or, as I do, 91% alcohol to dilute them down.  For this class, I wanted to use a different applicator that I had read about being used and was impressed with how it works.  The samples below with the stripey look to them is just using this applicator.  What is it?  It's a Magic Eraser!  Don't pay a lot for them from the supermarket, go to one of the cheap stores (Reject Shop, or Red Dot or similar) and buy a pack for only a few dollars.  Cut a piece off, drop on a drop of a couple of different colours, add a little alcohol (or blending solution) and swipe on.  This is how you get the striped effect.  The other ones I have blobbed it onto the card base (I used both Photo Paper and Yupo) like you would with your normal felt.  The alcohol doesn't soak in too much to the sponge and I found by doing a double size of the card (so 5" x 7"), it was easier to control the stripes.  As shown by the first and last card, these were both done at the same time.  The gold that you can see is Pinata Brass or Pinata Gold that has either just been applied directly from a tiny needle-nose bottle, or added and then a little 91% alcohol on top to get it to blend and move around.
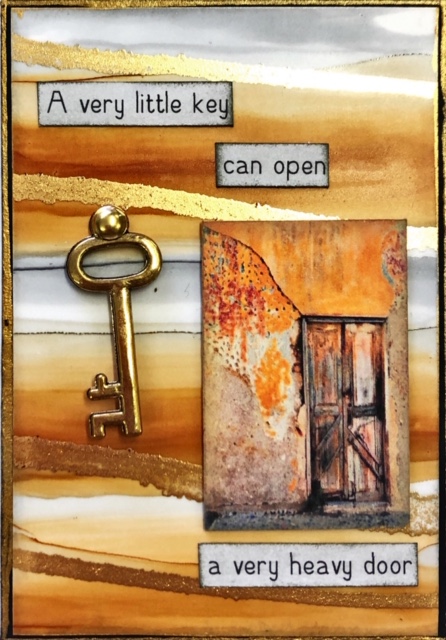
"Heavy door"...

"Up at the stars"...

"Escape the ordinary"...

"Seas the day"...

"Join Nasa"...

"Hang on"...

Friday, July 12, 2019

SHAVING FOAM SPARKLE

Thus begins Technique Book #22.  Years ago we used shaving foam to create a marbled background (a great technique to re-visit by the way).  This technique is also using shaving foam but it is used in conjunction with Distress Oxide Inks.  I stumbled across this technique while trawling YouTube video's and had a play around with it to get it to work on the smaller size of ATC's, rather than on a card front.  The application of Distress Oxide to a small acrylic block, then a small swipe of shaving foam, then swipe that across your white card stock results in a messy, grungy style of colour application.  The addition of embossing in a couple of colours through the centre that has been left white helps to tie it all together.  I love how many ways you can use embossing powder, as a focus or feature, or as part of the background.  

This is my cover.  It's 20cm x 15cm (or 8" x 6").
The tree and owl are die-cuts, the skull design across the
bottom is a stamp and the net stuff up the top is some
Halloween fabric that I bought when it was on
clearance last year in November.  

"Terrors"...
(Both the bird & fence are
embossed with Black UTEE)

"Dead Fish"...
(The silver up the top is another fabric.
Check the dance section at your local
fabric store for what can be used on
ATC's and cards!)

"Scenic Route"...
(Tree, deer, rabbit & eagle
are all die-cuts.  The gold ones
are cut from a gold metallic paper pad
from K-Mart!)

"Feel the rain"...
(The 3 branches are all embossed with
Black UTEE.)

"Sparkle"...
(Gold leaf shape is also die-cut from the same
metallic paper from K-Mart.)


Finally, another sample from my previous class, Enamel Backgrounds.
"Tangled"...
(The bat up the top is made from some chopped up bits of
black glue stick that have been put into a silicon bat mould,
then heated.  Because the mould is silicon, the heat-gun doesn't
affect it and the glue dries quickly.  It's been rubbed over
with silver and gold metallic paint to bring out the details.)