Tuesday, July 26, 2016

YUPO WITH ALCOHOL INKS

This is the beginning of Book #16 and it's a Yupo and Alcohol Ink class.  Yupo is a synthetic paper that is non-porous so you can use any of your alcohol inks on it and the colours remain very, VERY vibrant!  The white pen I have used that stands out so well on the alcohol inks is a Sharpie Water-based marker.  Probably the best white pen I've used!  I also used a Black Extra Fine Sharpie as well.

So the idea for my samples is to drop individual drips onto the Yupo (remember that these 5 samples below are atc sized which is 2-1/2" x 3-1/2" which is very small) and you can add other colours inside of a previously applied colour but it is really a matter of trail and error.  Some colours will bloom with another different coloured edge, one that comes to mind was Cool Peri Alcohol Ink which is a light mauve colour but blooms with a brighter pink border!  You can use pressurised air in a can to blow it around before it dries, you can also add rubbing alcohol by drips or spray to make the inks react further, it's just a lot of trial and error.  If you want to do more of a landscape you need to work on a larger size.  

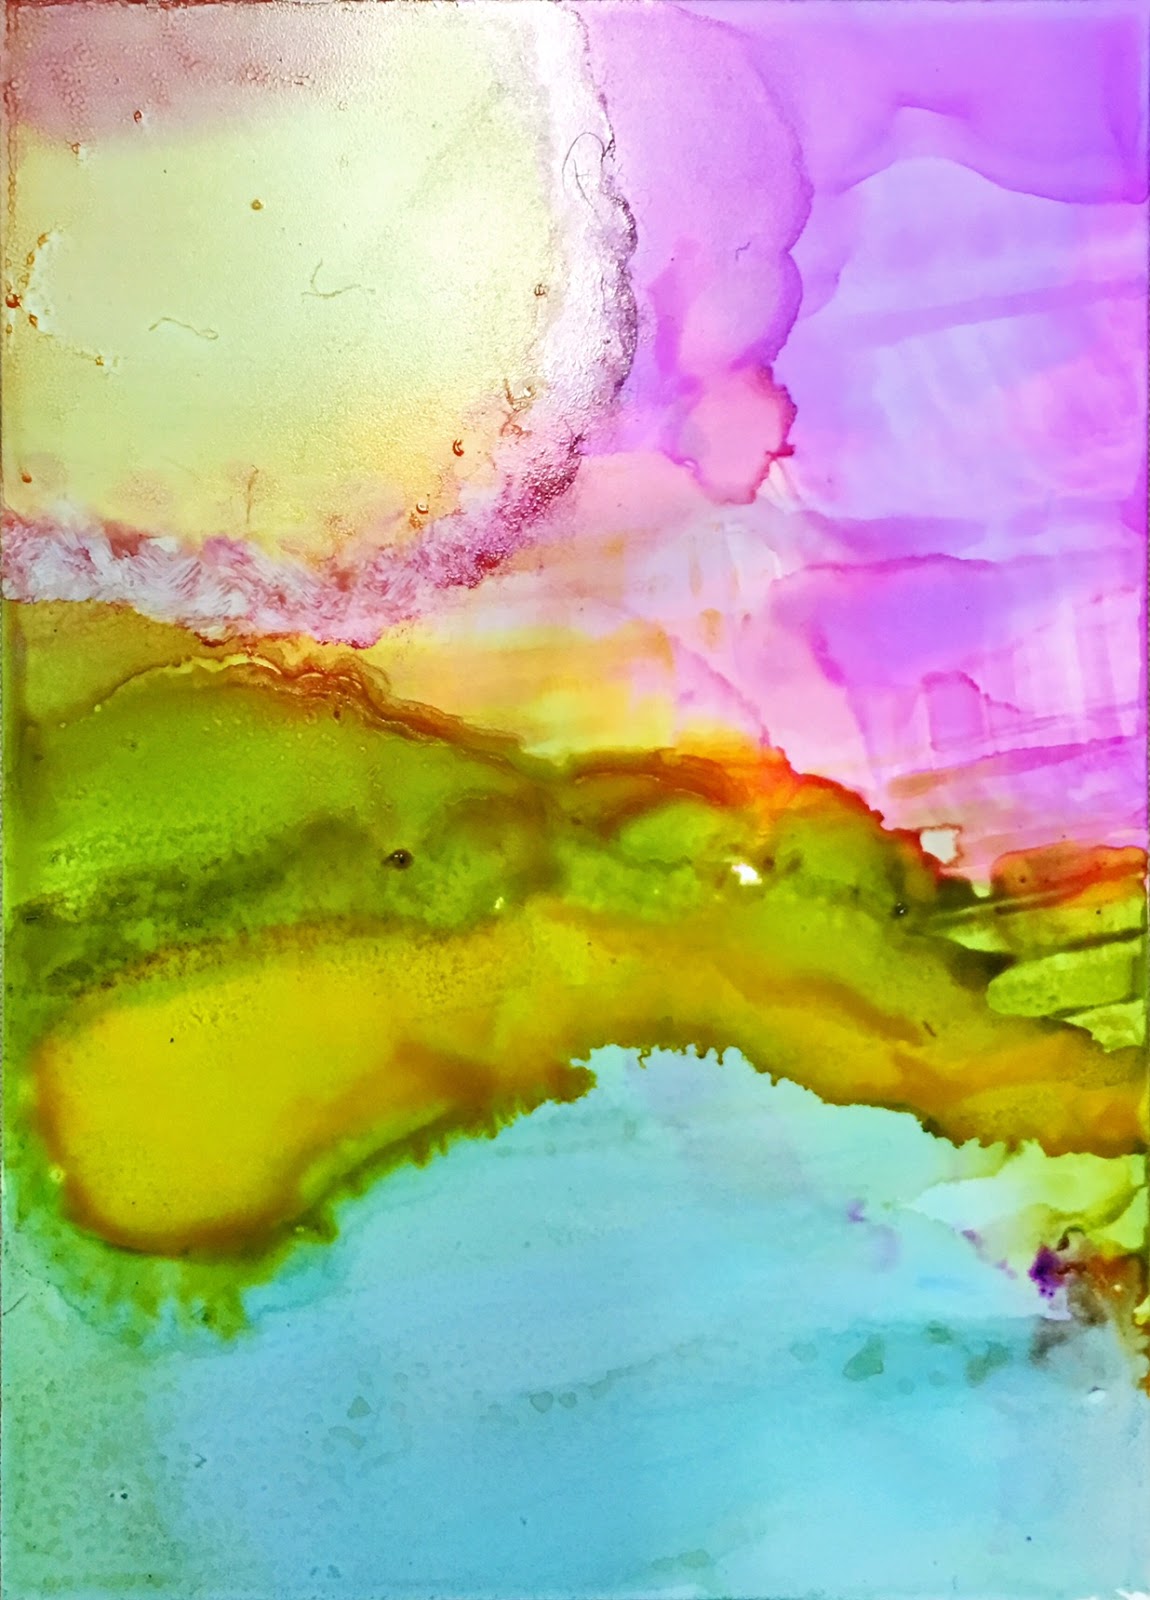
My cover is a piece of Yupo that is 8" wide by 6" high and I managed to get a landscape sort of theme happening because of this larger size.  Experiment, play and don't think something is no good, put it aside and come back to it.  

This is my cover...

"Jellyfish"...

"Friends close"...

"Moon"...

"The sea"...

"Caged"... (my attempt at a landscape
on a smaller scale)

Below are the same 5 atc's with only the alcohol ink on the Yupo paper.  You can see what a difference it makes by using the white  and black pen!

Jellyfish

Friends close

Moon

The sea

Caged

Tuesday, July 12, 2016

BLEEDING BACKGROUNDS

This is the last technique for this current book so the next technique in a fortnight will be the beginning of Book #16 and we will be using Yupo Paper!!!   Before I get ahead of myself with the excitement of Yupo Paper and Alcohol Inks, this fortnight's technique is called Bleeding Backgrounds.  I have used both crepe paper as well as cheap tissue paper (not the acid free stuff) as these both bleed beautifully onto watercolour paper when you add water.  I quite like some of the white exposed areas as well but if you wanted to totally cover your area, you can.  

You can either stamp straight onto the background and then use your chosen colouring in medium to colour in your image, ie: Gelato's, watercolour crayons, Twinkling H2O's, Distress Markers etc.  I actually used watercolour pencils to colour in the image first, then used an aqua brush (water brush that holds water in the barrel) to blend the colours together.  In the first two examples below, Bacteria and Regenerate, I stamped the images onto plain card and coloured first before fussy cutting out and attaching to the background.  The final two were both stamped straight onto the background and then I used watercolour pencils to add extra colour and water to blend.

"Bacteria"... (like my hand-drawn bacteria?)

"Regenerate"...

"Eat WHAT?"...

"Home"...

Friday, July 1, 2016

TEXTURED METALLIC BACKGROUNDS

The class this fortnight uses both white smooth watercolour card as well as Kraft colour card.  Both give a very different look with the white showing more of the true colours and the Kraft giving a darker tone because of the brown colour of the base of this card.  I have used both Distress Stains as well as the Distress Paints using Tim Holtz's method of swiping colour onto the craft sheet (not to be confused with the Kraft coloured card!  ;-)   and then swiping your card through it.  In all instances I have made sure to include one of the 3 metallic stains or paints to give a metallic lustre to the cards that you can't see on the computer screen.  I also used gesso to make extra marks on the cards and on most of them have coated the gesso with embossing powder for extra texture to the embossing.  

"Not cheap"... (Paints on white watercolour card)

"100%"... (Stains on white watercolour card)

"Twirl"... (Paint on white watercolour card)

"New eyes"... (Stains on white watercolour card)

"Chaos"... (Stains on Kraft card)
Notice the little skull stamped shapes in the background?  They were
made by cutting some craft foam into a skull shape and
stamping into gesso and then coating with a little embossing
powder.  Embossing powder wasn't over all of the stamping, 
just a little to add some texture.


The samples below are all on the Kraft coloured card.  You can see
how the Metallic paints in the Stains and Paints really make it shimmer!

Stains...

Paint...

Paint...

"Stains"...