Tuesday, March 19, 2019

MESSY WATERCOLOURING

It's been a while since we've used our watercolours so thought this was a good opportunity to drag them out.  I used my Gansai Tambi watercolour palette set as well as my smaller Gansai Tambi Pearl set of 6 gorgeous shimmery pearl colours.  The trick to making this look cohesive is to repeat your colours on your images that you've stamped and the best part of all.... don't worry about staying in the lines.  Like all watercolouring, if you allow the sections to dry so you are not putting wet against wet, you won't have the bleeding issue that causes the colours to blend too much.  So the heat gun is your friend in this class.  All you need then is a little quote, an embellishment and you're done!

"Live in colour"...

"The best bugs"...
(the little bugs are stamped onto pre-sanded
shrink plastic, shrunk, then an alcohol pen
was used to add colour on the back of them)

"Dig it"...

"Sparkle"...


"Original style"...
(this one has a chipboard frame mounted
around the edge that has been embossed
with black UTEE, then while hot, a few
sprinkles of gold UTEE, heated again and
then I dragged a pin through the gold while 
still hot to move it around a little)

Monday, March 4, 2019

BURNING LANDSCAPES YUPO

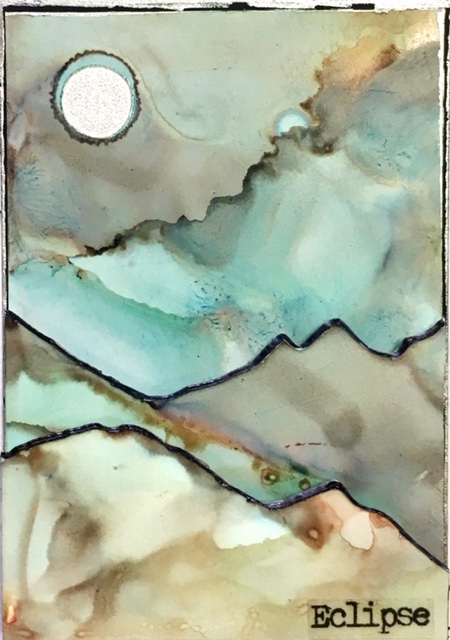
While we have our soldering irons out (or wood burning tools), this is another way to utilise this particular tool with alcohol inked backgrounds on Yupo.  Unfortunately, you can't see the depth in these through a computer monitor or phone.  They are very 3-dimensional, similar to the last class where we layered the pieces of holey Yupo using little pieces of dimensional foam tape.  This time I have used larger sheets of craft foam to layer the top pieces to create depth.  So you have the background, then a piece raised on 1 piece of craft foam, then a front layer also raised on another piece of craft foam.  It looks wonderful in the flesh!  Not as fiddly as the last class but still takes a little more time than just doing a normal alcohol ink background.  Because these are so spectacular in themselves, they really don't need a lot of embellishments, hence the use of a clear sticky word on each of them.  Apart from the second one, "earth", which has some Jac paper (double-sided adhesive) cloud shapes applied and then brushed with Perfect Pearls.

"Dreamscape"...

"Earth"...

"Eclipse"...

"Dramatic"...

"Picturesque"...

"Traverse"...

Saturday, February 16, 2019

BURNING YUPO

Yupo is a synthetic substrate that artists have been using alcohol ink on for several years now, and as it is plastic, some bright spark worked out that you could burn it with a soldering iron or wood burning tool.  These are my samples.  All of the layers are created using 2-3mm foam squares to create the dimension.  To call this a fiddly process, would be the understatement of the year!  

A word of caution.... heating/melting/burning plastic is toxic and should always be done outdoors in moderation.  This is not something I plan on doing every single day so a respirator is unnecessary.  If you were considering doing this technique more frequently, look after your health and use a respirator.  I have burnt the holes/shapes beforehand and then inked on some, but have also done the burning when the Yupo was already inked and dry.  The final one, Traverse, is slightly different but the top of the hills are still burnt/melted with the soldering iron to create the shape.  You don't want to cover these up too much, hence the need for minimal decorating.  

"Firecracker"...

"Elemental"..

"Nocturnal"...

"Mushroom"...

"Traverse"...

Tuesday, February 5, 2019

BAKED TEXTURE EMBOSSING & BRUSHO'S

I've always loved embossing powders and ever since Seth Apter's Baked Texture Embossing Powders hit the market I've really enjoyed the beautiful colours and texture these embossing powders give.  For this technique, I've combined tissue paper crinkled background with Brusho's (& Cosmic Pixie Powders and Tonic Shimmer Powders as you can never have enough shimmer in your life), plus the addition of a swipe of a clear embossing ink pad to hit the high spots of the tissue paper, then the addition of the Baked Texture Embossing Powders.  These products combined create an amazing background that you just know,  just by looking at it, it's going to feel lumpy, bumpy but also kind of smooth (that's the embossing powder part).

"Carrion"...

Here's a side shot so you can see the depth in this one.

"Sparkle"...

"Fragility"...
(More of a mixed media feel to this one, chipboard heart painted to look rusty,
metal dragonfly that's coated in a couple of colours of embossing powders, then
clear coated with UTEE - Ultra Thick Embossing Enamel, book paper lightly painted
with Ken Oliver's Copper Liquid Metals which was also dripped down a couple
of the sides.  The dragonfly is attached using copper coloured thread.  Lastly a couple
of gunmetal coloured stud embellishments on the book paper.  The colour of the
Embossing Powder on the aqua background is the Emerald Creek Fractured Ice.  
Beautiful embossing powder that one!  Check it out.

 "Hashtags"...
(The little weird guy is an Octopode stamp on shrink plastic, coloured and
shrunk.  The heart has a real shimmer to it as it's chipboard, painted black,
then Angelina Film glued on, trimmed around the edges and heated which
gives it the multi-toned coppery effect.)

Friday, January 25, 2019

MINERAL PAPER & ALCOHOL INKS

Yupo paper has been the usual substrate for using alcohol inks for a few years now as it has more flow and movement than just using gloss card stock.  Yupo is a synthetic paper made from polypropylene (plastic) so withstands the alcohol ink and subsequent application of 91% or 99% alcohol to make the inks spread further and dilute them (or you can use blending solution).  Mineral paper is made from rocks so it is different in that it gives a more matte finish than Yupo, but the inks do react differently on it.  They don't tend to spread as easily without the application of the alcohol and if you apply Snow Cap (white alcohol ink) mixed with some 91% or 99% alcohol, this will make the surface shinier.  It is still a wonderful substrate to try out if you can get hold of some.

"Life update"...

"New beginning"...

"Owl sings"...

"Keep friends close"...

"Ugly"...

Tuesday, November 27, 2018

DISTRESS OXIDE WRINKLE

Our last class of the year, is, as usual, a Christmas themed class.  This is a particularly easy background technique using the Distress Oxide Ink Pads and Glad Wrap (plastic wrap) to create the subtle wrinkle background that shows just how amazing the Distress Oxide colours are.  I applied the Distress Oxide (usually 2 colours only per gloss card), either by brayer or direct from the pad, then spritz a piece of Glad Wrap and lay down over the card, smooshing with your fingers to create the wrinkles.  You need to let it dry but as you don't use very much water, it dries pretty quickly.  Peel off the Glad Wrap and it reveals a gorgeous soft background.  I had a lot of fun looking for pictures and sayings for these Christmas themed atc's and have made up a Christmas sheet for the girls in class so they too can have Jason Momoa as a very non-Christmas Santa.  🤤🤤🤤

"Prosec-ho ho ho"...

"Ignore you"...

"Your soul"...

"Over-eating"...

"Shark!"...
(love this one)

"Not Santa"...
(& yep, this one as well)

Saturday, November 10, 2018

ALCOHOL INK LIFT OFF TECHNIQUE

I have had my Ranger Alcohol Ink Lift Off Pad for a while now but have only just got around to having a play and it is SO addictive!  There are plenty of YouTube video's on how to use it so I won't go into that here but I will say that your stamps need to be squeaky clean before you use this ink pad.  I generally wipe my stamps over with a baby wipe after stamping with them but they need more intense cleaning than just that.  If you have a stamp cleaner, use it to get your stamps as clean as possible.  My poor Lift Off Pad now has some darker marks on it from a stamp that had been used with Stazon.  Even though you think it's clean, this ink pad will cause the Stazon to reactivate a bit so you'll get some transfer to the pad.   Clean your stamps!
I have included a couple of the stamped images that were done on the plain white cardstock after lifting off the alcohol ink from the alcohol inked Yupo surface.  Make sure your alcohol ink on the Yupo is dry too before doing this technique.  Hope you enjoy the samples as much as I enjoyed making them.  Couldn't seem to stop.....  😉

"Boo"...

 "Boo 2"...
(See that white stuff?  That's stretchy cobweb from a 
Halloween pack!)

"Music speaks"...

"Solstice"...

"Hum of bees"...

"Scarlet Tree"...
(Stamped images from the Solstice card above)


The stamped image from Hum of bees above.

Stamped image from Music speaks above.

Below are the last 2 samples from the previous Brick Wall Background from last fortnight. 
Do you love my ants?  

"Uninvited guest"...

"Shhhh"...